> ## Documentation Index
> Fetch the complete documentation index at: https://docs.kodelabs.com/llms.txt
> Use this file to discover all available pages before exploring further.
# Vendors
> Manage vendors for your AssetOps portfolio
In AssetOps, **vendors** are created at the [portfolio level](/products/assetops/quickstart/usage-workflow#portfolio-level) and represent the external companies and service providers that carry out maintenance activities. Vendors are shared across all buildings in your portfolio, providing a single, consistent list available throughout.
Adding vendors and assigning users as vendor members allows you to link the right provider to work orders and track who is responsible for outsourced maintenance and repairs. You can assign vendors when [creating work orders](/products/assetops/work-orders/work-orders-overview#create-a-work-order).
```mermaid actions={false} theme={"theme":{"light":"github-light","dark":"github-dark"}}
---
config:
theme: neutral
---
flowchart LR
subgraph s1["Portfolio-Level"]
P["Vendors"]
end
subgraph s2["Portfolio-Wide Vendors"]
V1["Vendor 1"]
V2["Vendor 2"]
V3["Vendor 3"]
end
A["AssetOps"] --- B["Portfolio"]
B -- access --- P
P -- "shared across buildings" --- V1 & V2 & V3
P:::Sky
V1:::Rose
V2:::Rose
V3:::Rose
classDef Sky stroke-width:1px, stroke-dasharray:none, stroke:#374D7C, fill:#E2EBFF, color:#374D7C
classDef Rose stroke-width:1px, stroke-dasharray:none, stroke:#FF5978, fill:#FFDFE5, color:#8E2236
linkStyle 0 stroke:#00C853,fill:none
linkStyle 1 stroke:#00C853,fill:none
linkStyle 2 stroke:#FF6D00,fill:none
linkStyle 3 stroke:#FF6D00,fill:none
linkStyle 4 stroke:#FF6D00,fill:none
```
## View the vendors list
Open **Vendors** from the portfolio sidebar to see all vendors in your portfolio.
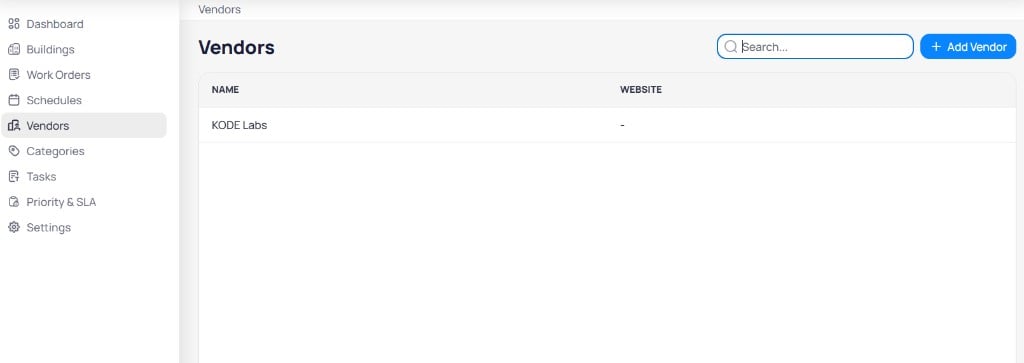 The table includes:
| Column | Description |
| ----------- | ------------------------------- |
| **Name** | Vendor display name |
| **Website** | Vendor website URL, if provided |
Use the search field to filter vendors by name. Select **+ Add Vendor** in the top right to create a new vendor.
## Add vendors
In AssetOps, navigate to **Vendors** in the portfolio-level sidebar.
On the Vendors page, select **+ Add Vendor** to open the creation form.
Enter the **Name** (required) and **Website** (optional) for the new vendor.
Select **Create** to add the vendor. The new vendor appears in the list.
## Vendor details and members
Select a vendor from the list to open its details page. The **Details** tab shows general information and assigned members.
The table includes:
| Column | Description |
| ----------- | ------------------------------- |
| **Name** | Vendor display name |
| **Website** | Vendor website URL, if provided |
Use the search field to filter vendors by name. Select **+ Add Vendor** in the top right to create a new vendor.
## Add vendors
In AssetOps, navigate to **Vendors** in the portfolio-level sidebar.
On the Vendors page, select **+ Add Vendor** to open the creation form.
Enter the **Name** (required) and **Website** (optional) for the new vendor.
Select **Create** to add the vendor. The new vendor appears in the list.
## Vendor details and members
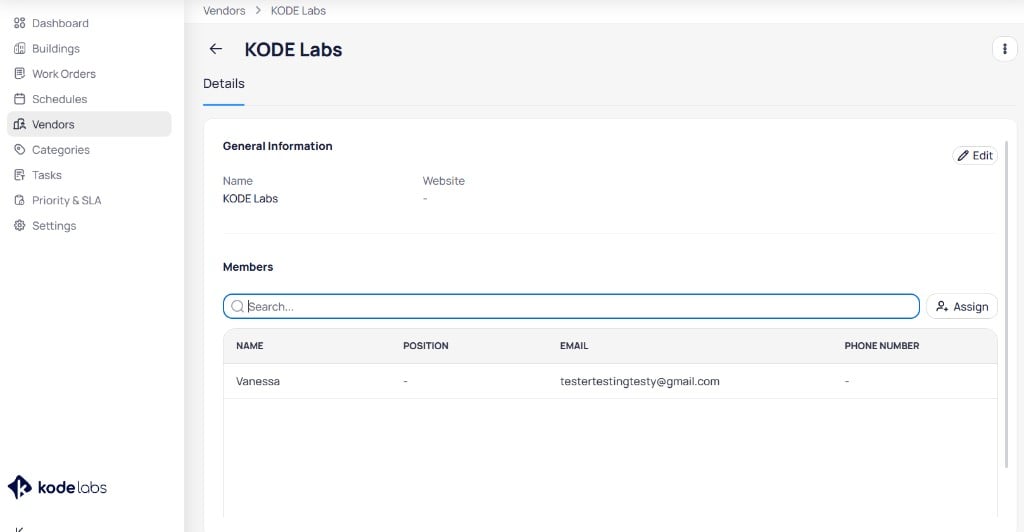
Select a vendor from the list to open its details page. The **Details** tab shows general information and assigned members.
 ### General information
The **General information** section displays the vendor **Name** and **Website**. Select **Edit** to update these fields.
### Members
The **Members** section lists users assigned to the vendor. Members can receive and manage work orders linked to that vendor.
| Column | Description |
| ---------------- | -------------------------- |
| **Name** | Member display name |
| **Position** | Role or title, if provided |
| **Email** | Contact email |
| **Phone number** | Contact phone, if provided |
Use the search field to find members. Select **+ Assign** to add users to the vendor.
User profiles for vendor members are [created and managed in Launchpad](/products/launchpad/client-organizations/users#add-user-internal). Assign existing users on the vendor details page.
## Assign members
In AssetOps, navigate to **Vendors** in the portfolio-level sidebar.
Select a vendor from the list to open its details page.
In the **Members** section, select **+ Assign** and choose the users you want to assign as vendor members.
Select **Save** to confirm the assignment.
## Manage vendors
On the vendor details page, you can edit vendor information, manage members, or remove the vendor.
* Select **Edit** in the **General information** section to update the vendor name or website.
* Select the menu icon in the upper right corner to delete the vendor.
* Use the row menu on a member to unassign that user from the vendor.
* Select **+ Assign** to add additional members.
## Related modules
Assign vendors when you create work orders at the building level.
Open a building to use vendors in building-level operations.
### General information
The **General information** section displays the vendor **Name** and **Website**. Select **Edit** to update these fields.
### Members
The **Members** section lists users assigned to the vendor. Members can receive and manage work orders linked to that vendor.
| Column | Description |
| ---------------- | -------------------------- |
| **Name** | Member display name |
| **Position** | Role or title, if provided |
| **Email** | Contact email |
| **Phone number** | Contact phone, if provided |
Use the search field to find members. Select **+ Assign** to add users to the vendor.
User profiles for vendor members are [created and managed in Launchpad](/products/launchpad/client-organizations/users#add-user-internal). Assign existing users on the vendor details page.
## Assign members
In AssetOps, navigate to **Vendors** in the portfolio-level sidebar.
Select a vendor from the list to open its details page.
In the **Members** section, select **+ Assign** and choose the users you want to assign as vendor members.
Select **Save** to confirm the assignment.
## Manage vendors
On the vendor details page, you can edit vendor information, manage members, or remove the vendor.
* Select **Edit** in the **General information** section to update the vendor name or website.
* Select the menu icon in the upper right corner to delete the vendor.
* Use the row menu on a member to unassign that user from the vendor.
* Select **+ Assign** to add additional members.
## Related modules
Assign vendors when you create work orders at the building level.
Open a building to use vendors in building-level operations.