> ## Documentation Index
> Fetch the complete documentation index at: https://docs.kodelabs.com/llms.txt
> Use this file to discover all available pages before exploring further.
# Product Enablement
> Learn how to activate KODE OS and enable products
As a channel partner in Launchpad, one of your primary responsibilities is **activating KODE OS** and **enabling products** for client organizations. Before doing so, ensure the following prerequisites are met:
* You already have existing clients in your Launchpad workspace.
* Your clients have already added buildings to their Launchpad workspace.
After you create a client, switch to the client's Launchpad workspace and create the buildings for that client. Then return to your channel partner view to activate KODE OS and enable products for the buildings you created.
If you are a client organization, contact your KODE Labs representative to enable products for your buildings.
## Activate KODE OS
Activation for client organizations is performed from a client's [Details section](/products/launchpad/channel-partners/clients#details) and must be completed individually for each client. To activate `KODE OS` for a client organization, follow the steps outlined below.
In Launchpad, navigate to the **Clients** page via the left-hand sidebar.
Select a client from the list. You will be redirected to their **Details** section.
In the **Details** section, locate **Apps** and click `Activate` for KODE OS.
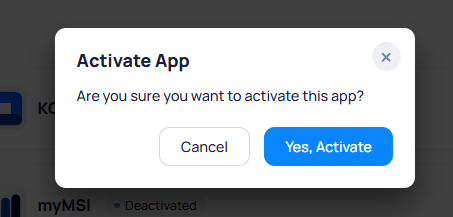
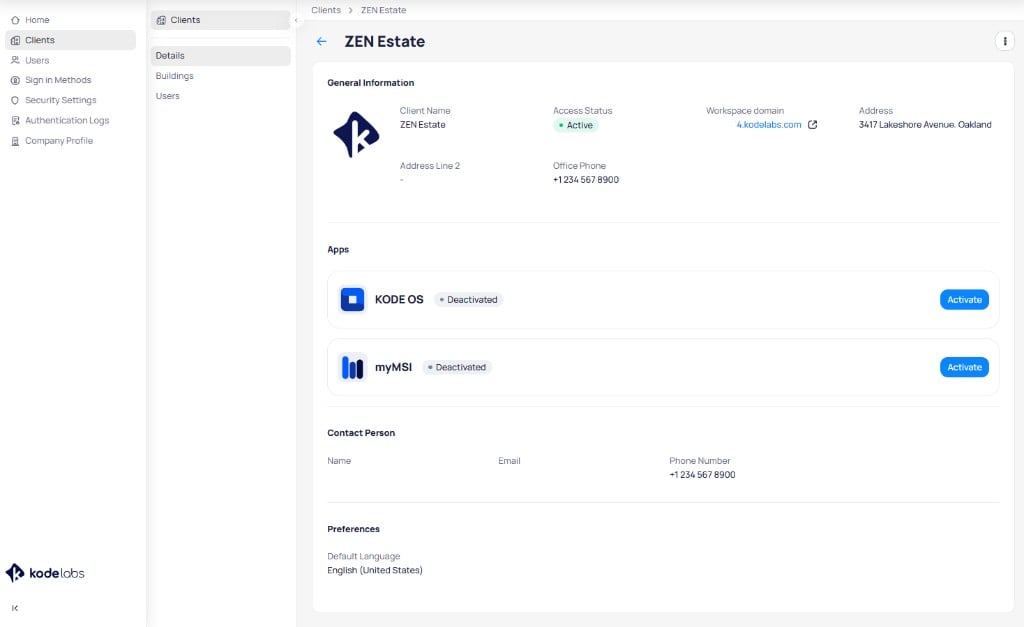 A confirmation dialog appears. Click `Yes, Activate` to proceed.
 Once `KODE OS` is active, the products available to you as a channel partner will appear, allowing you to proceed with enabling products for buildings in the client's portfolio.
## Enable Products
As a channel partner, you can enable products either for multiple or all buildings in a client’s portfolio at once, or for a specific building individually. Product enablement is available from the [Details](/products/launchpad/channel-partners/clients#details) and [Buildings](/products/launchpad/channel-partners/clients#buildings) sections
### Enable Products via Details
The client's **Details** section allows you to enable products across multiple or all buildings in the client's portfolio simultaneously. To do so, follow the steps outlined below:
In Launchpad, navigate to the **Clients** page via the left-hand sidebar.
Select a client from the list. You will be redirected to their **Details** section.
Assuming KODE OS is active, you should see product cards for all available products.
Once `KODE OS` is active, the products available to you as a channel partner will appear, allowing you to proceed with enabling products for buildings in the client's portfolio.
## Enable Products
As a channel partner, you can enable products either for multiple or all buildings in a client’s portfolio at once, or for a specific building individually. Product enablement is available from the [Details](/products/launchpad/channel-partners/clients#details) and [Buildings](/products/launchpad/channel-partners/clients#buildings) sections
### Enable Products via Details
The client's **Details** section allows you to enable products across multiple or all buildings in the client's portfolio simultaneously. To do so, follow the steps outlined below:
In Launchpad, navigate to the **Clients** page via the left-hand sidebar.
Select a client from the list. You will be redirected to their **Details** section.
Assuming KODE OS is active, you should see product cards for all available products.
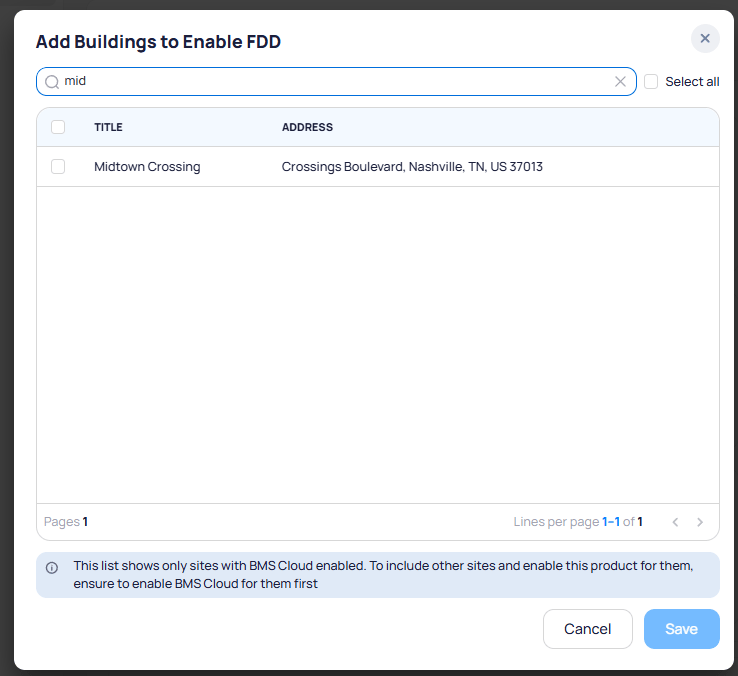
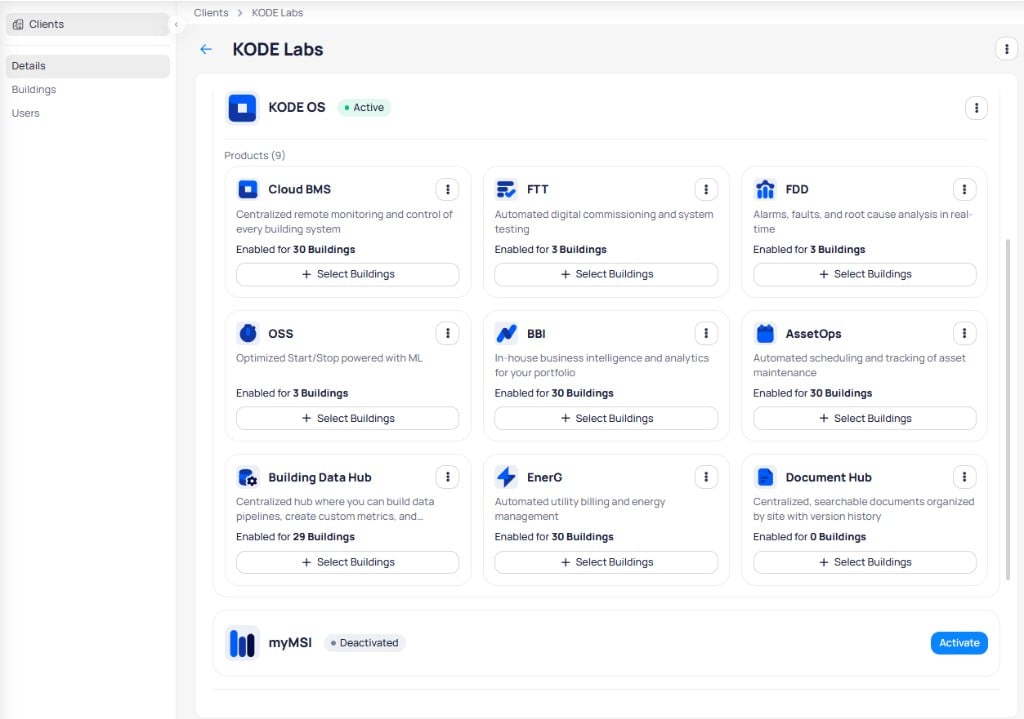 Each product card has a `+Select Buildings` button, allowing you to choose the buildings where the product should be enabled. A dialog opens where you search for and select the buildings to enable.
 To disable a product across all buildings, click the icon and select `Mass Building Disablement`.
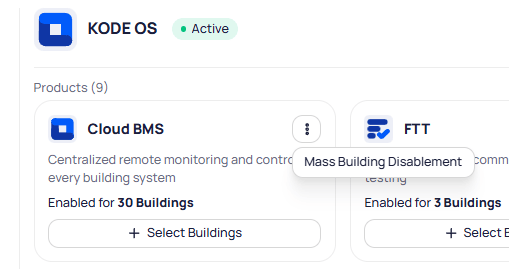 After selecting the buildings, click `Save` to enable the product.
```mermaid actions={false} theme={"theme":{"light":"github-light","dark":"github-dark"}}
---
config:
layout: dagre
theme: neutral
---
flowchart LR
subgraph Client2Info["Client-Specific Sections"]
C1["Details Page"]
C2["Buildings Page"]
C3["Users Page"]
end
subgraph s1["KODE OS Products"]
P1["Cloud BMS"]
P2["AssetOps"]
P3["FTT"]
P4["FDD"]
P5["OSS"]
P6["EnerG"]
P7["Building BI"]
P8["Building Data Hub"]
end
A2["Client A"] -- enter --> C1
C1 -- activate --- K["KODE OS"]
K -- available products --- s1
P1 -- Bulk Enable --- S1["Select Buildings"]
P2 -- Bulk Enable --- S2["Select Buildings"]
P3 -- Bulk Enable --- S3["Select Buildings"]
P4 -- Bulk Enable --- S4["Select Buildings"]
P5 -- Bulk Enable --- S5["Select Buildings"]
P6 -- Bulk Enable --- S6["Select Buildings"]
P7 -- Bulk Enable --- S7["Select Buildings"]
P8 -- Bulk Enable --- S8["Select Buildings"]
linkStyle 0 stroke:#00C853,fill:none
linkStyle 1 stroke:#00C853,fill:none
linkStyle 2 stroke:#FF6D00
linkStyle 10 stroke:#FF6D00
linkStyle 9 stroke:#FF6D00
linkStyle 8 stroke:#FF6D00
linkStyle 7 stroke:#FF6D00
linkStyle 6 stroke:#FF6D00
linkStyle 5 stroke:#FF6D00
linkStyle 4 stroke:#FF6D00
linkStyle 3 stroke:#FF6D00
```
### Enable Products via Buildings
The client's **Buildings** section allows you to enable products for individual buildings by selecting a building and activating products from its dedicated page. To do so, follow the steps outlined below:
In Launchpad, navigate to the **Clients** page via the left-hand sidebar.
Select a client from the list. You will be redirected to their **Details** section by default.
Navigate to the client's **Buildings** section and select a building.
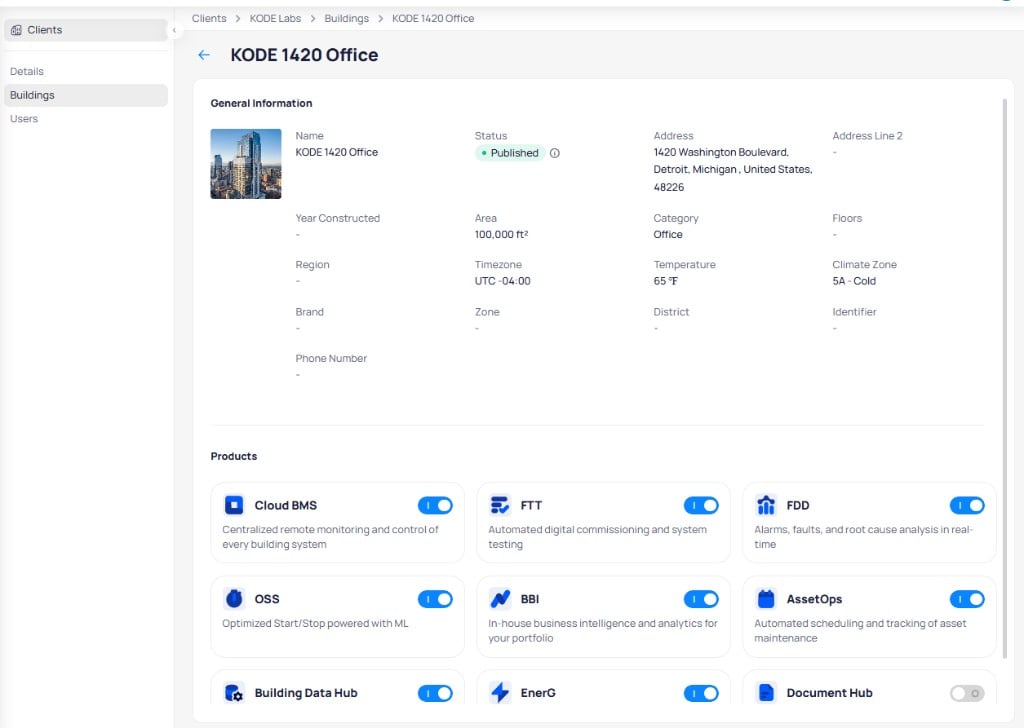
Toggle on the products you want to enable for the selected building. The building page shows general information at the top and product cards with toggle controls at the bottom.
After selecting the buildings, click `Save` to enable the product.
```mermaid actions={false} theme={"theme":{"light":"github-light","dark":"github-dark"}}
---
config:
layout: dagre
theme: neutral
---
flowchart LR
subgraph Client2Info["Client-Specific Sections"]
C1["Details Page"]
C2["Buildings Page"]
C3["Users Page"]
end
subgraph s1["KODE OS Products"]
P1["Cloud BMS"]
P2["AssetOps"]
P3["FTT"]
P4["FDD"]
P5["OSS"]
P6["EnerG"]
P7["Building BI"]
P8["Building Data Hub"]
end
A2["Client A"] -- enter --> C1
C1 -- activate --- K["KODE OS"]
K -- available products --- s1
P1 -- Bulk Enable --- S1["Select Buildings"]
P2 -- Bulk Enable --- S2["Select Buildings"]
P3 -- Bulk Enable --- S3["Select Buildings"]
P4 -- Bulk Enable --- S4["Select Buildings"]
P5 -- Bulk Enable --- S5["Select Buildings"]
P6 -- Bulk Enable --- S6["Select Buildings"]
P7 -- Bulk Enable --- S7["Select Buildings"]
P8 -- Bulk Enable --- S8["Select Buildings"]
linkStyle 0 stroke:#00C853,fill:none
linkStyle 1 stroke:#00C853,fill:none
linkStyle 2 stroke:#FF6D00
linkStyle 10 stroke:#FF6D00
linkStyle 9 stroke:#FF6D00
linkStyle 8 stroke:#FF6D00
linkStyle 7 stroke:#FF6D00
linkStyle 6 stroke:#FF6D00
linkStyle 5 stroke:#FF6D00
linkStyle 4 stroke:#FF6D00
linkStyle 3 stroke:#FF6D00
```
### Enable Products via Buildings
The client's **Buildings** section allows you to enable products for individual buildings by selecting a building and activating products from its dedicated page. To do so, follow the steps outlined below:
In Launchpad, navigate to the **Clients** page via the left-hand sidebar.
Select a client from the list. You will be redirected to their **Details** section by default.
Navigate to the client's **Buildings** section and select a building.
Toggle on the products you want to enable for the selected building. The building page shows general information at the top and product cards with toggle controls at the bottom.
 ```mermaid actions={false} placement="bottom-left" theme={"theme":{"light":"github-light","dark":"github-dark"}}
---
config:
layout: dagre
theme: neutral
---
flowchart LR
subgraph Client2Info["Client-Specific Pages"]
C1["Details Page"]
C2["Buildings Page"]
C3["Users Page"]
end
subgraph s1["Client Buildings"]
B1["Building 1"]
end
subgraph s2["KODE OS Products"]
P1["Cloud BMS"]
P2["AssetOps"]
P3["FTT"]
P4["FDD"]
P5["OSS"]
P6["EnerG"]
P7["Building BI"]
P8["Building Data Hub"]
end
A2["Client A"] -- enter --> C2
C2 -- view --- LB["List of Buildings"]
LB -- select --- B1
B1 -- enter --- D1["Dedicated Page"]
D1 -- enable --- P1 & P2 & P3 & P4 & P5 & P6 & P7 & P8
linkStyle 2 stroke:#00C853,fill:none
linkStyle 3 stroke:#00C853
linkStyle 4 stroke:#FF6D00,fill:none
linkStyle 5 stroke:#FF6D00,fill:none
linkStyle 6 stroke:#FF6D00,fill:none
linkStyle 7 stroke:#FF6D00,fill:none
linkStyle 8 stroke:#FF6D00,fill:none
linkStyle 9 stroke:#FF6D00,fill:none
linkStyle 10 stroke:#FF6D00,fill:none
linkStyle 11 stroke:#FF6D00,fill:none
```
```mermaid actions={false} placement="bottom-left" theme={"theme":{"light":"github-light","dark":"github-dark"}}
---
config:
layout: dagre
theme: neutral
---
flowchart LR
subgraph Client2Info["Client-Specific Pages"]
C1["Details Page"]
C2["Buildings Page"]
C3["Users Page"]
end
subgraph s1["Client Buildings"]
B1["Building 1"]
end
subgraph s2["KODE OS Products"]
P1["Cloud BMS"]
P2["AssetOps"]
P3["FTT"]
P4["FDD"]
P5["OSS"]
P6["EnerG"]
P7["Building BI"]
P8["Building Data Hub"]
end
A2["Client A"] -- enter --> C2
C2 -- view --- LB["List of Buildings"]
LB -- select --- B1
B1 -- enter --- D1["Dedicated Page"]
D1 -- enable --- P1 & P2 & P3 & P4 & P5 & P6 & P7 & P8
linkStyle 2 stroke:#00C853,fill:none
linkStyle 3 stroke:#00C853
linkStyle 4 stroke:#FF6D00,fill:none
linkStyle 5 stroke:#FF6D00,fill:none
linkStyle 6 stroke:#FF6D00,fill:none
linkStyle 7 stroke:#FF6D00,fill:none
linkStyle 8 stroke:#FF6D00,fill:none
linkStyle 9 stroke:#FF6D00,fill:none
linkStyle 10 stroke:#FF6D00,fill:none
linkStyle 11 stroke:#FF6D00,fill:none
```