> ## Documentation Index
> Fetch the complete documentation index at: https://documentation.kodelabs.com/llms.txt
> Use this file to discover all available pages before exploring further.
# Users
> Learn how to create and manage channel partner users
The **Users** page, accessible from the left-hand sidebar, displays all users in your Launchpad workspace. It allows you to create new internal users directly, invite existing users from external organizations, and provides detailed controls for managing existing users regardless of origin.
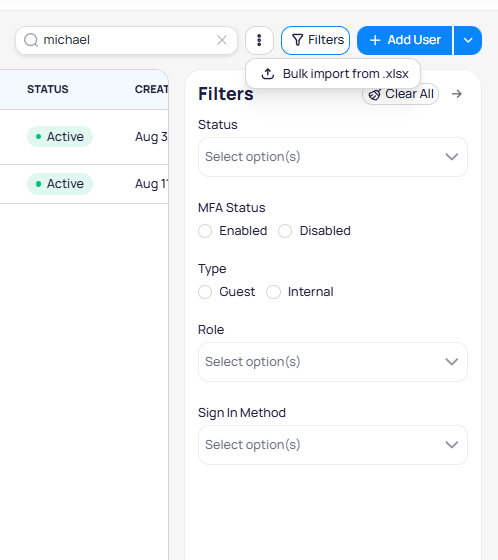
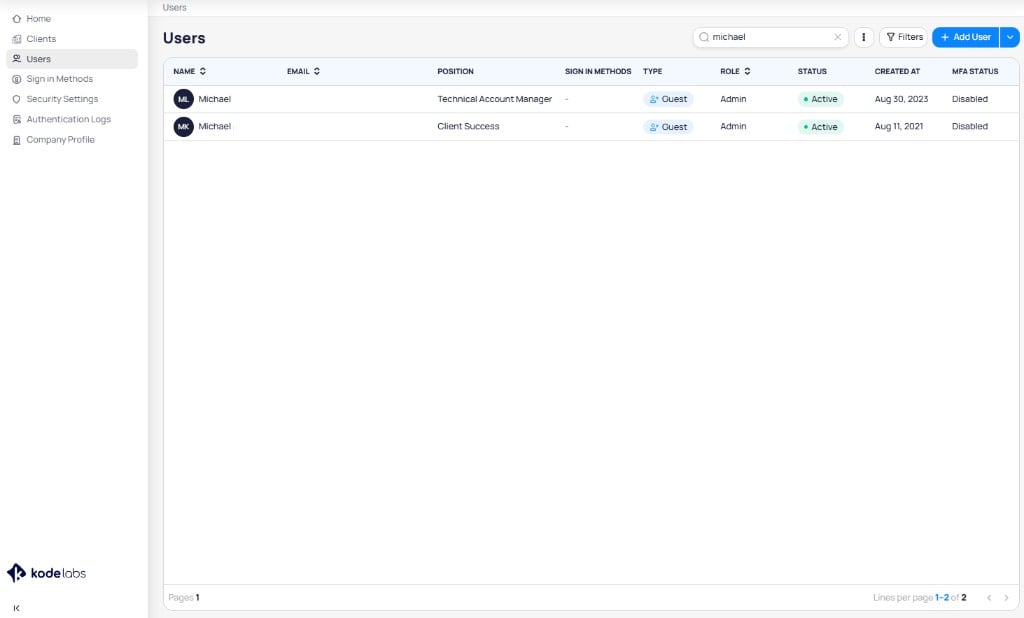 You can filter the user list by status, MFA status, type, role, and sign-in method using the `Filters` panel. You can also bulk import users from a spreadsheet using the `Bulk import from .xlsx` option in the dropdown next to `+Add User`.
 ## User Types
In Launchpad, users are categorized as either **Internal Users** or **Guest Users**. These profiles define a user's type and determine what can be managed for a given user.
* Internal users represent entities whose account and user profile both reside within the same organization. Internal users authenticate directly using the credentials and sign-in methods issued by your organization.
* Guest users represent entities whose user profile resides in your organization while their account resides in a different (external) organization. They continue to authenticate using the credentials and sign-in methods issued by their parent organization.
```mermaid actions={false} theme={"theme":{"light":"github-light","dark":"github-dark"}}
---
config:
layout: TB
theme: neutral
---
flowchart LR
%% Your Organization
subgraph OrgA["Organization A"]
IU_Profile["Internal User Profile"]
EU_Profile["External User Profile"]
IU_Account["Account"]
end
%% External Organization
subgraph OrgB["Organization B"]
EU_Account["Account"]
end
%% Connections
IU_Account -. connected ..- IU_Profile
IU_Profile -. connected .- IU_Account
EU_Account -. connected ....- EU_Profile
EU_Profile -. connected .- EU_Account
%% Labels / Classes
classDef internal stroke:#FF6D00,fill:none;
classDef external stroke:#00C853,fill:none;
class IU_Account,IU_Profile internal;
class EU_Account,EU_Profile external;
```
## Create Users
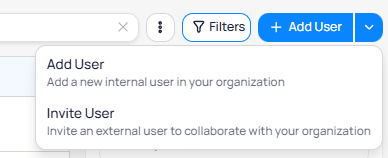
You can create or invite users from the **Users** page using the `+Add User` button. The dropdown offers two options: `Add User` for internal users and `Invite User` for guest users.
## User Types
In Launchpad, users are categorized as either **Internal Users** or **Guest Users**. These profiles define a user's type and determine what can be managed for a given user.
* Internal users represent entities whose account and user profile both reside within the same organization. Internal users authenticate directly using the credentials and sign-in methods issued by your organization.
* Guest users represent entities whose user profile resides in your organization while their account resides in a different (external) organization. They continue to authenticate using the credentials and sign-in methods issued by their parent organization.
```mermaid actions={false} theme={"theme":{"light":"github-light","dark":"github-dark"}}
---
config:
layout: TB
theme: neutral
---
flowchart LR
%% Your Organization
subgraph OrgA["Organization A"]
IU_Profile["Internal User Profile"]
EU_Profile["External User Profile"]
IU_Account["Account"]
end
%% External Organization
subgraph OrgB["Organization B"]
EU_Account["Account"]
end
%% Connections
IU_Account -. connected ..- IU_Profile
IU_Profile -. connected .- IU_Account
EU_Account -. connected ....- EU_Profile
EU_Profile -. connected .- EU_Account
%% Labels / Classes
classDef internal stroke:#FF6D00,fill:none;
classDef external stroke:#00C853,fill:none;
class IU_Account,IU_Profile internal;
class EU_Account,EU_Profile external;
```
## Create Users
You can create or invite users from the **Users** page using the `+Add User` button. The dropdown offers two options: `Add User` for internal users and `Invite User` for guest users.
 Create a new internal user in this channel partner organization.
Once inside Launchpad, navigate to the **Users** page located on the left-hand sidebar.
Once inside **Users** click the `+Add User` button and select `Add User`.
Configure the required details for the new user. The form includes general information fields and active sign-in method selection.
Create a new internal user in this channel partner organization.
Once inside Launchpad, navigate to the **Users** page located on the left-hand sidebar.
Once inside **Users** click the `+Add User` button and select `Add User`.
Configure the required details for the new user. The form includes general information fields and active sign-in method selection.
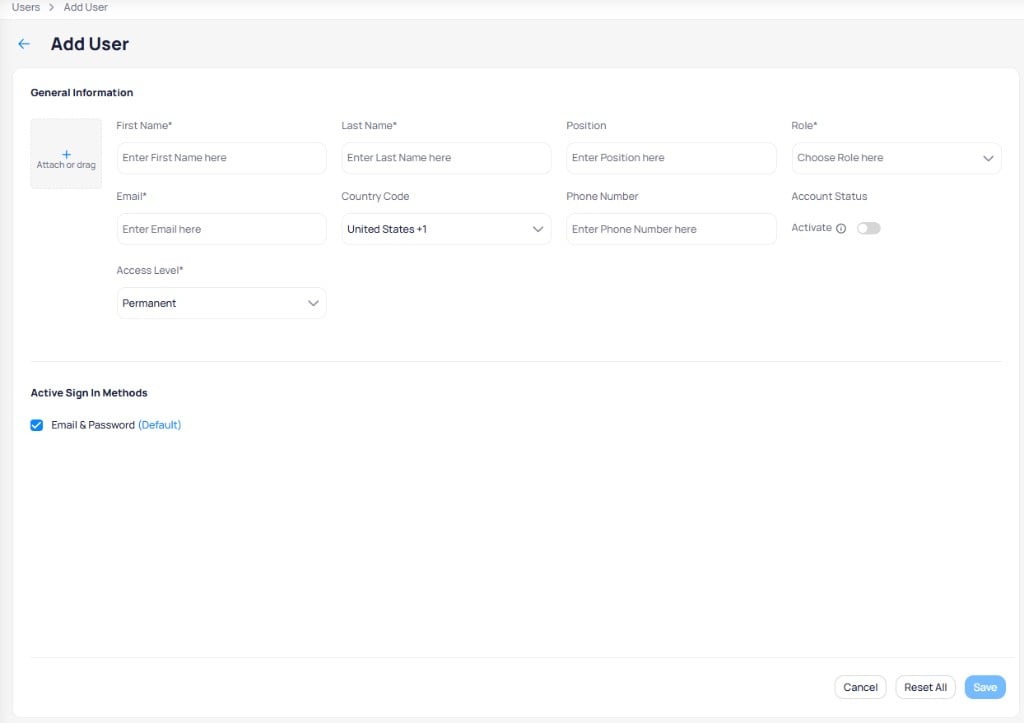 | Field | Example Configuration |
| ------------------------------------------------------------------------------------------------------------------- | ---------------------------------- |
| First Name | `Jane` |
| Last Name | `Smith` |
| Position | `Facilities Manager` |
| Role | `Admin`, `Restricted`, `View Only` |
| Email | `jane.smith@example.com` |
| Country Code | `United States +1` |
| Phone Number | `555 123 4567` |
| Account Status | `Toggle On/Off` |
| Access Level | `Permanent or Temporary` |
| Active Sign-In Methods | `Choose Sign-In Method` |
Once you have configured the required user details, click `Save` to create the user.
Invite an existing user from a trusted organization as a guest.
Once inside Launchpad, navigate to the **Users** page located on the left-hand sidebar.
Once inside **Users** click the `+Add User` button and select `Invite User`.
Configure the required details for the new user. The form requires selecting a trusted organization and entering the guest user's email.
| Field | Example Configuration |
| ------------------------------------------------------------------------------------------------------------------- | ---------------------------------- |
| First Name | `Jane` |
| Last Name | `Smith` |
| Position | `Facilities Manager` |
| Role | `Admin`, `Restricted`, `View Only` |
| Email | `jane.smith@example.com` |
| Country Code | `United States +1` |
| Phone Number | `555 123 4567` |
| Account Status | `Toggle On/Off` |
| Access Level | `Permanent or Temporary` |
| Active Sign-In Methods | `Choose Sign-In Method` |
Once you have configured the required user details, click `Save` to create the user.
Invite an existing user from a trusted organization as a guest.
Once inside Launchpad, navigate to the **Users** page located on the left-hand sidebar.
Once inside **Users** click the `+Add User` button and select `Invite User`.
Configure the required details for the new user. The form requires selecting a trusted organization and entering the guest user's email.
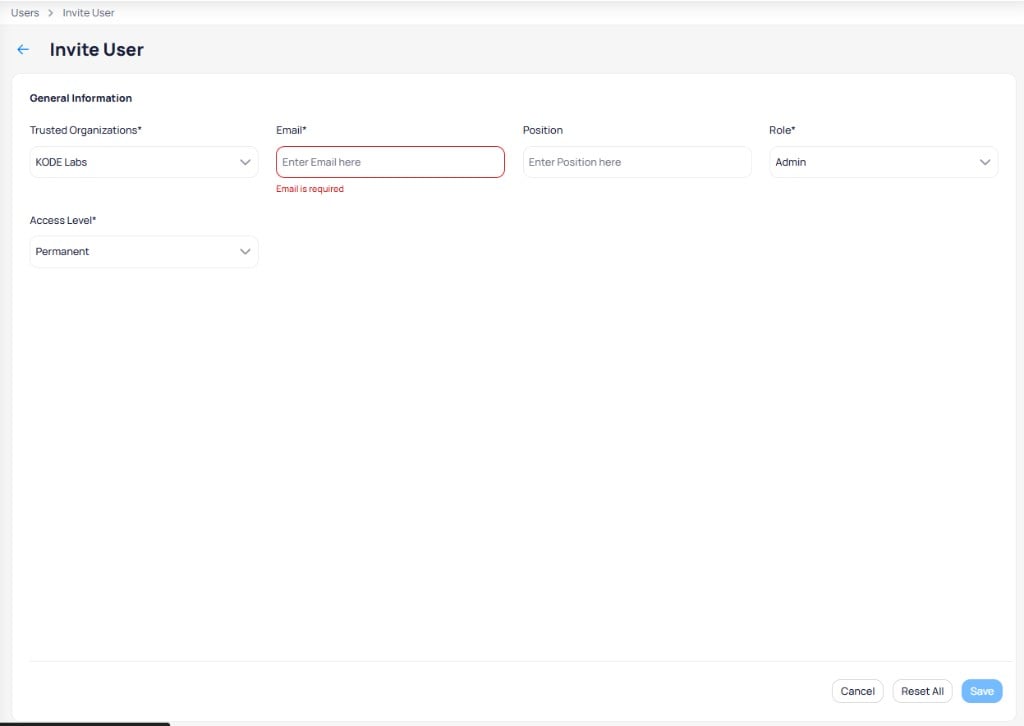 | Field | Example Configuration |
| ------------------------------------------------------------------------------------------------------------ | ---------------------------------- |
| Trusted Organizations | `Acme Corp` |
| Email | `jane.smith@acme.com` |
| Position | `Facilities Manager` |
| Role | `Admin`, `Restricted`, `View Only` |
| Access Level | `Permanent or Temporary` |
Sign-in methods are inherited from the parent organization and don't require configuration when inviting users.
Once you have configured the required user details, click `Save` to invite the user.
## Manage Users
The **Users** page lists all existing users in rows, with each row displaying key details about the respective user. Each user in your organization, whether internal or external, has a dedicated user page that provides a centralized interface to view and manage all details related to a specific user.
```mermaid actions={false} theme={"theme":{"light":"github-light","dark":"github-dark"}}
---
config:
layout: dagre
theme: neutral
---
flowchart LR
subgraph s1["Channel Partner Users"]
U1["User 1"]
U2["User 2"]
U3["User 3"]
end
A["Users Page"] -- view --- A1["Users Table"]
A1 -- select ---- U1
U1 -- view & manage --- BIP1["Dedicated Page"]
A1 -- select --- U2 & U3
U2 -- view & manage --- BIP2["Dedicated Page"]
U3 -- view & manage --- BIP3["Dedicated Page"]
linkStyle 1 stroke:#00C853,fill:none
linkStyle 2 stroke:#FF6D00,fill:none
linkStyle 3 stroke:#00C853,fill:none
linkStyle 4 stroke:#00C853,fill:none
linkStyle 5 stroke:#FF6D00,fill:none
linkStyle 6 stroke:#FF6D00
```
To manage a user, follow the steps outlined below:
Once inside Launchpad, navigate to the **Users** page located on the left-hand sidebar.
Select a user from the list of users. You will be redirected to their **dedicated** page, which displays all general information for that user.
| Field | Example Configuration |
| ------------------------------------------------------------------------------------------------------------ | ---------------------------------- |
| Trusted Organizations | `Acme Corp` |
| Email | `jane.smith@acme.com` |
| Position | `Facilities Manager` |
| Role | `Admin`, `Restricted`, `View Only` |
| Access Level | `Permanent or Temporary` |
Sign-in methods are inherited from the parent organization and don't require configuration when inviting users.
Once you have configured the required user details, click `Save` to invite the user.
## Manage Users
The **Users** page lists all existing users in rows, with each row displaying key details about the respective user. Each user in your organization, whether internal or external, has a dedicated user page that provides a centralized interface to view and manage all details related to a specific user.
```mermaid actions={false} theme={"theme":{"light":"github-light","dark":"github-dark"}}
---
config:
layout: dagre
theme: neutral
---
flowchart LR
subgraph s1["Channel Partner Users"]
U1["User 1"]
U2["User 2"]
U3["User 3"]
end
A["Users Page"] -- view --- A1["Users Table"]
A1 -- select ---- U1
U1 -- view & manage --- BIP1["Dedicated Page"]
A1 -- select --- U2 & U3
U2 -- view & manage --- BIP2["Dedicated Page"]
U3 -- view & manage --- BIP3["Dedicated Page"]
linkStyle 1 stroke:#00C853,fill:none
linkStyle 2 stroke:#FF6D00,fill:none
linkStyle 3 stroke:#00C853,fill:none
linkStyle 4 stroke:#00C853,fill:none
linkStyle 5 stroke:#FF6D00,fill:none
linkStyle 6 stroke:#FF6D00
```
To manage a user, follow the steps outlined below:
Once inside Launchpad, navigate to the **Users** page located on the left-hand sidebar.
Select a user from the list of users. You will be redirected to their **dedicated** page, which displays all general information for that user.
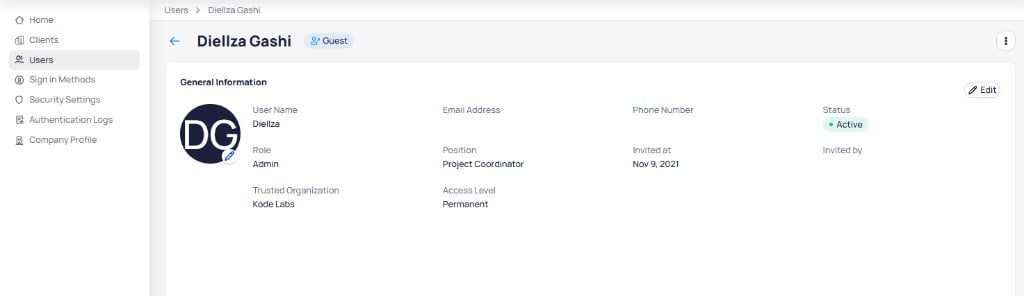 Once inside the user's dedicated page, you can complete the following actions:
* Use the icon to edit user details.
* Use the icon to manage the user, including deactivating or deleting them, changing their sign-in method, or resending the setup email.
You can only change the sign-in method or resend the setup email for internal users.
Once inside the user's dedicated page, you can complete the following actions:
* Use the icon to edit user details.
* Use the icon to manage the user, including deactivating or deleting them, changing their sign-in method, or resending the setup email.
You can only change the sign-in method or resend the setup email for internal users.