> ## Documentation Index
> Fetch the complete documentation index at: https://docs.kodelabs.com/llms.txt
> Use this file to discover all available pages before exploring further.
# Apps (KODE OS)
> Learn how to create and manage buildings in your organization portfolio
The **Apps** page, available from the left-hand sidebar, is where you manage **KODE OS**. In Launchpad, KODE OS is the primary application and consolidates all products into a single building operating system.
Your channel partner activates KODE OS and enables products across your building portfolio. Once activated, you can assign KODE OS to users and specify a role that defines their permissions and allowed actions for each KODE OS product.
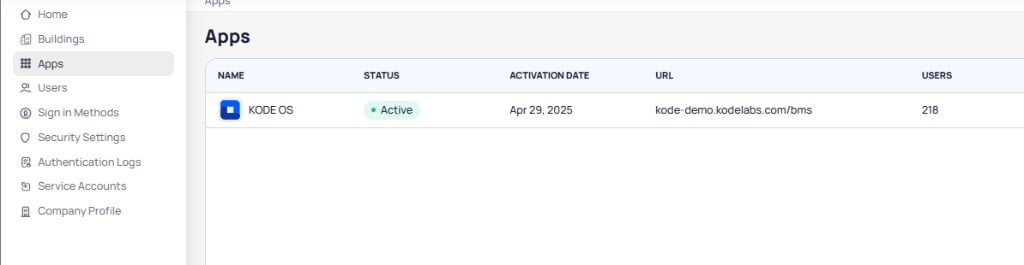 Only users with the **Admin** role in Launchpad can assign KODE OS and respective application roles. Refer to the list of [available Launchpad roles](/products/launchpad/get-started/accounts-and-users#client-organizations) for client organizations.
Selecting **KODE OS** gives you access to three sections: **Details**, **Roles**, and **Users**.
## Details
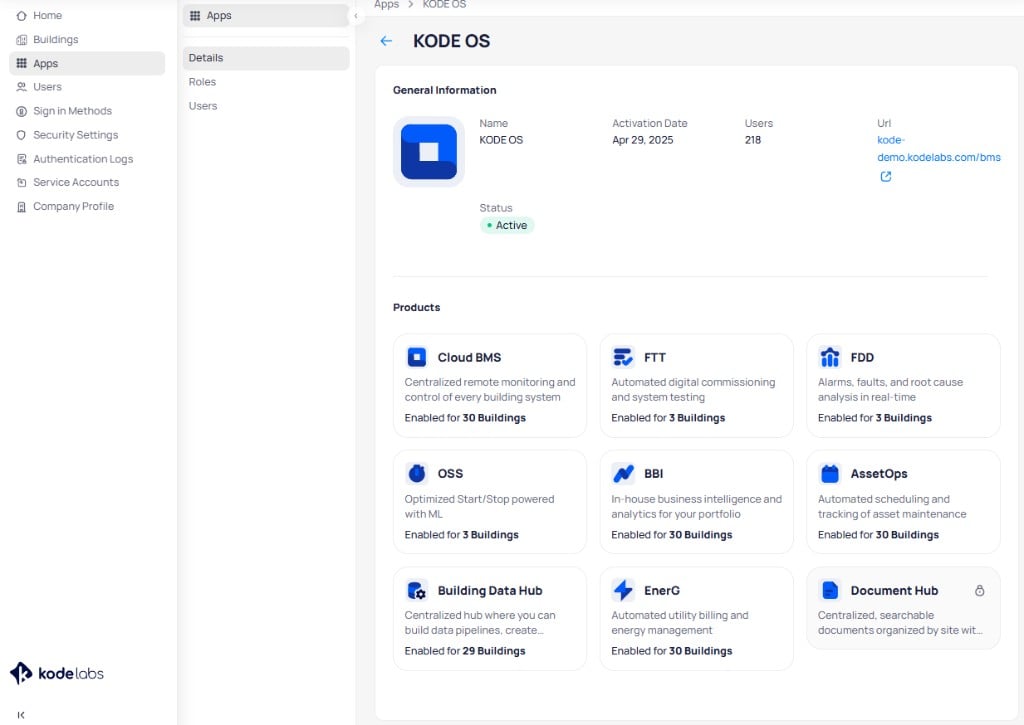
This section provides an overview of KODE OS for your organization and the products enabled across your building portfolio.
Use the **Details** section to:
* View KODE OS application information
* View which products are enabled for your organization
Only users with the **Admin** role in Launchpad can assign KODE OS and respective application roles. Refer to the list of [available Launchpad roles](/products/launchpad/get-started/accounts-and-users#client-organizations) for client organizations.
Selecting **KODE OS** gives you access to three sections: **Details**, **Roles**, and **Users**.
## Details
This section provides an overview of KODE OS for your organization and the products enabled across your building portfolio.
Use the **Details** section to:
* View KODE OS application information
* View which products are enabled for your organization
 ```mermaid actions={false} theme={"theme":{"light":"github-light","dark":"github-dark"}}
---
config:
theme: neutral
---
flowchart LR
subgraph s1["Apps"]
A1["KODE OS"]
end
subgraph s2["KODE OS sections"]
D1["Details"]
D2["Roles"]
D3["Users"]
end
subgraph s3["Details"]
P1["Application Details"]
P2["Enabled products"]
end
A1 --
```mermaid actions={false} theme={"theme":{"light":"github-light","dark":"github-dark"}}
---
config:
theme: neutral
---
flowchart LR
subgraph s1["Apps"]
A1["KODE OS"]
end
subgraph s2["KODE OS sections"]
D1["Details"]
D2["Roles"]
D3["Users"]
end
subgraph s3["Details"]
P1["Application Details"]
P2["Enabled products"]
end
A1 --
----- D1 & D3
A1 --
--- D2
D1 -- View ----- P1 & P2
linkStyle 0 stroke:#00C853,fill:none
linkStyle 1 stroke:none
linkStyle 2 stroke:none,fill:none
linkStyle 3 stroke:#FF6D00,fill:
linkStyle 4 stroke:#FF6D00,fill:none
```
## Roles
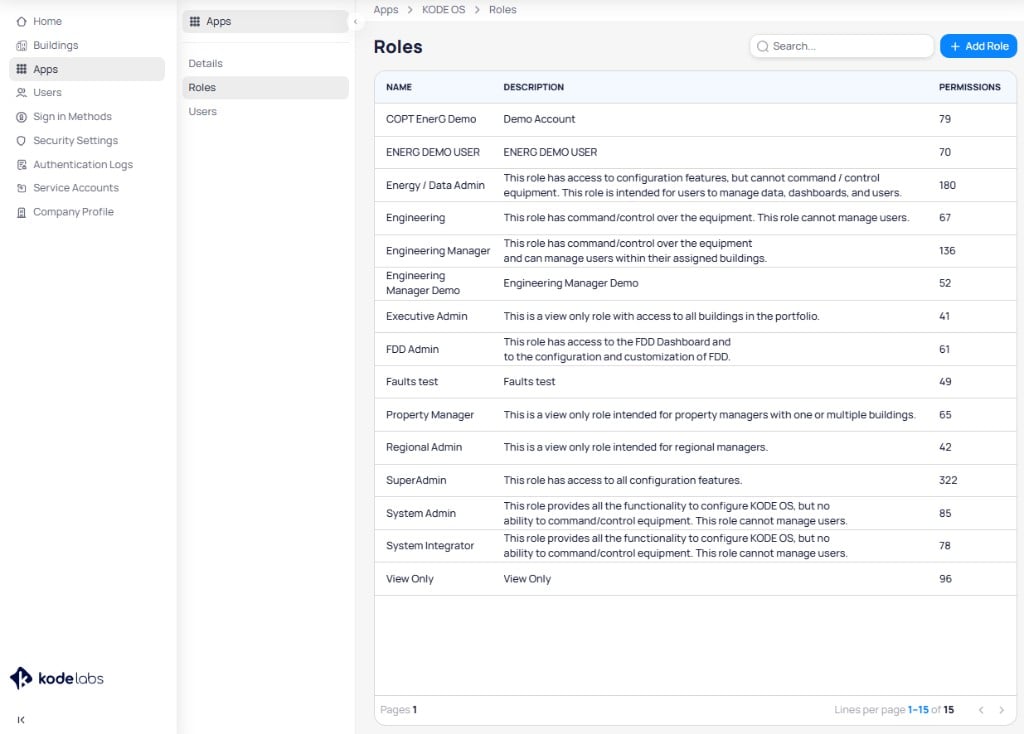
This section lists the KODE OS roles in your organization. You can create roles and define per-product Read and Write permissions for each role.
Use the **Roles** section to:
* View all KODE OS roles
* Create new roles and edit or delete existing ones
* Define per-product permissions for each role
See the [roles](/products/launchpad/client-organizations/apps#kode-os-roles) section for more details on KODE OS roles.
 ```mermaid actions={false} theme={"theme":{"light":"github-light","dark":"github-dark"}}
---
config:
theme: neutral
---
flowchart LR
subgraph s1["Apps"]
A1["KODE OS"]
end
subgraph s2["KODE OS sections"]
D1["Details"]
D2["Roles"]
D3["Users"]
end
subgraph s3["Roles"]
P1["Role List"]
P2["Role Creation"]
end
A1 --
```mermaid actions={false} theme={"theme":{"light":"github-light","dark":"github-dark"}}
---
config:
theme: neutral
---
flowchart LR
subgraph s1["Apps"]
A1["KODE OS"]
end
subgraph s2["KODE OS sections"]
D1["Details"]
D2["Roles"]
D3["Users"]
end
subgraph s3["Roles"]
P1["Role List"]
P2["Role Creation"]
end
A1 --
--- D1 & D3
A1 -- access --- D2
D2 -- View ----- P1
D2 -- Manage ----- P2
linkStyle 0 stroke:none,fill:none
linkStyle 2 stroke:#00C853,fill:none
linkStyle 1 stroke:none,fill:none
linkStyle 3 stroke:#FF6D00,fill:none
linkStyle 4 stroke:#FF6D00
```
## Users
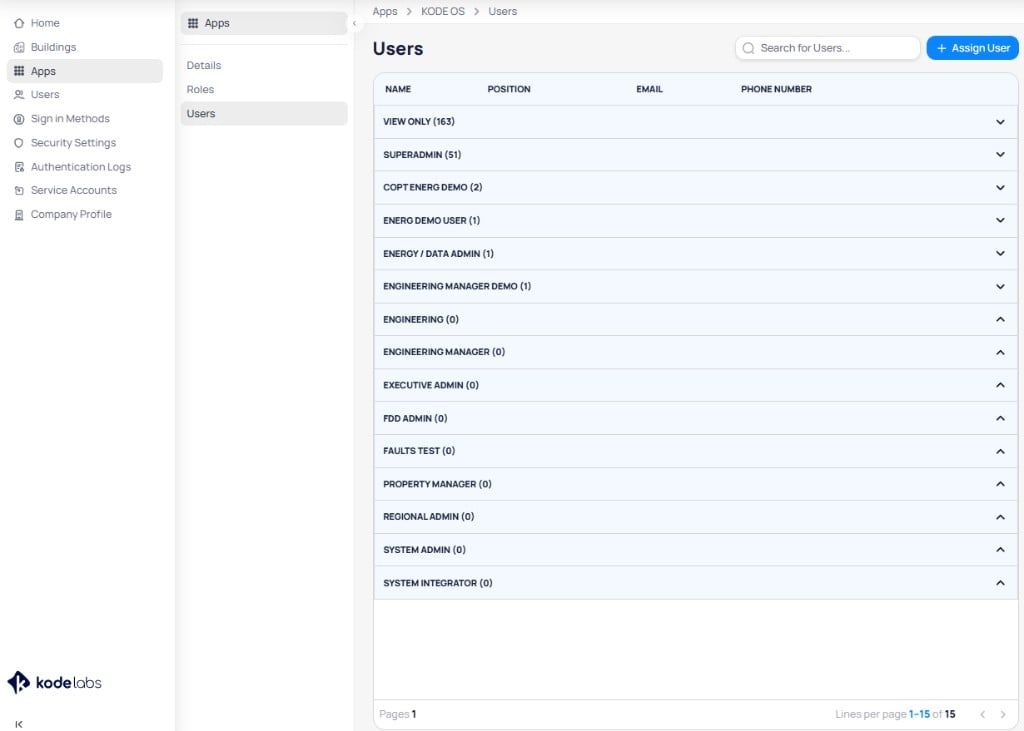
This section lists users in your organization and shows their KODE OS access and assigned role. You can assign KODE OS to users and change their role from here.
Use the **Users** section to:
* View which users have KODE OS access
* View or change the role assigned to each user
* Assign KODE OS to users who do not have access yet
 ```mermaid actions={false} theme={"theme":{"light":"github-light","dark":"github-dark"}}
---
config:
theme: neutral
---
flowchart LR
subgraph s1["Apps"]
A1["KODE OS"]
end
subgraph s2["KODE OS sections"]
D1["Details"]
D2["Roles"]
D3["Users"]
end
subgraph s3["Users"]
P1["Users by Assigned Role"]
P2["Role assignment"]
end
A1 --
```mermaid actions={false} theme={"theme":{"light":"github-light","dark":"github-dark"}}
---
config:
theme: neutral
---
flowchart LR
subgraph s1["Apps"]
A1["KODE OS"]
end
subgraph s2["KODE OS sections"]
D1["Details"]
D2["Roles"]
D3["Users"]
end
subgraph s3["Users"]
P1["Users by Assigned Role"]
P2["Role assignment"]
end
A1 --
--- D1 & D2
A1 -- access --- D3
D3 -- View ----- P1
D3 -- Manage ----- P2
linkStyle 0 stroke:none,fill:none
linkStyle 2 stroke:#00C853,fill:none
linkStyle 1 stroke:none,fill:none
linkStyle 3 stroke:#FF6D00,fill:none
linkStyle 4 stroke:#FF6D00
```
## KODE OS roles
KODE OS uses Role-Based Access Control (RBAC) to govern what each user can access. Instead of assigning permissions individually to each user, you assign permissions to roles. Users then inherit those permissions based on the role assigned to them. A role defines permissions at the product level, letting you scope access to specific capabilities without granting full access to every product.
A user in Launchpad can only have one `KODE OS` role assigned to them at a time.
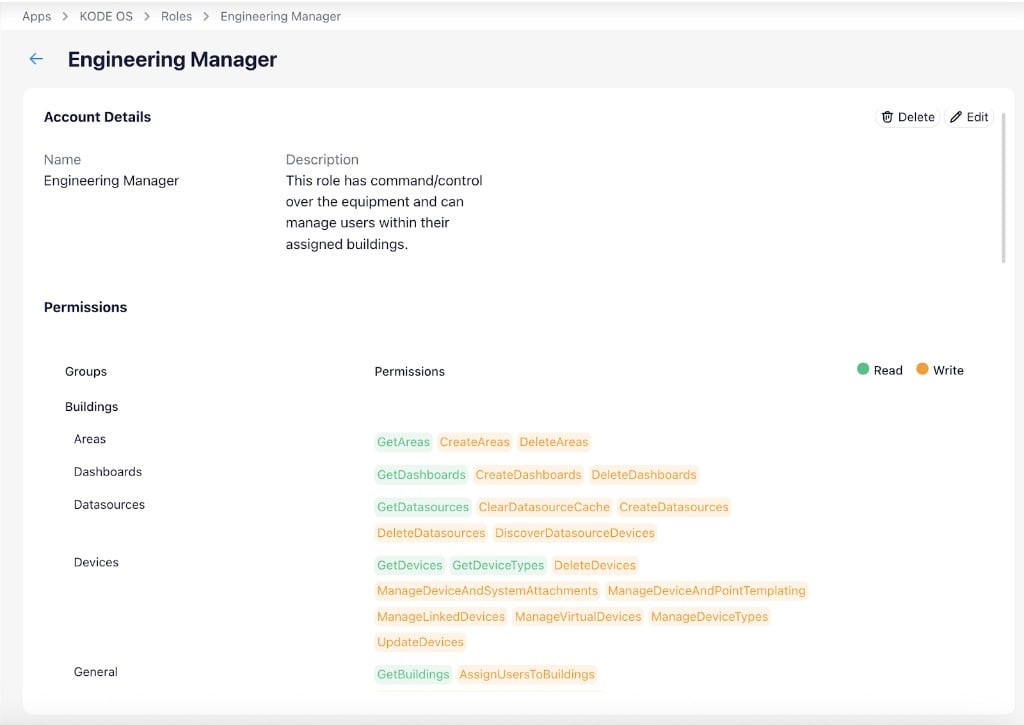
Selecting a role from the Roles page opens its detail page, where you can view the role name, description, and the full list of assigned permissions organized by group.
Module access such as Building BI edit comes from the Cloud BMS role permissions. Building assignment also limits which sites appear after sign-in. Change the role or buildings on the user record when someone reports missing sites or tools.
 Three users have access to every product. Within each product, their role's **Read** and **Write** permissions define what they can view and do.
```mermaid actions={false} theme={"theme":{"light":"github-light","dark":"github-dark"}}
---
config:
layout: dagre
theme: neutral
---
flowchart LR
CO["Client Organization"] --> users
subgraph users["Users"]
direction TB
U1["User 1"]
U2["User 2"]
U3["User 3"]
U4["User 4"]
U5["User 5"]
end
subgraph roles["KODE OS Roles"]
direction TB
R1["Admin"]
end
U1 -- "Assigned Role" --> R1
U2 -- "Assigned Role" --> R1
U3 -- "Assigned Role" --> R1
R1 -- "Per-product permissions" --> P1["Cloud BMS"]
R1 -- "Per-product permissions" --> P2["FTT"]
R1 -- "Per-product permissions" --> P3["FDD"]
R1 -- "Per-product permissions" --> P4["OSS"]
R1 -- "Per-product permissions" --> P5["BBI"]
R1 -- "Per-product permissions" --> P6["AssetOps"]
R1 -- "Per-product permissions" --> P7["Data Hub"]
R1 -- "Per-product permissions" --> P8["EnerG"]
linkStyle 1,2,3 stroke:#00C853,fill:none
linkStyle 4,5,6,7,8,9,10,11 stroke:#FF6D00,fill:none
```
Three users have access to reporting, diagnostics, energy, and monitoring products. Within each product, their role's **Read** and **Write** permissions define what they can view and do.
```mermaid actions={false} theme={"theme":{"light":"github-light","dark":"github-dark"}}
---
config:
layout: dagre
theme: neutral
---
flowchart LR
subgraph users["Users"]
direction TB
U1["User 1"]
U2["User 2"]
U3["User 3"]
U4["User 4"]
U5["User 5"]
end
subgraph roles["KODE OS Roles"]
direction TB
R1["Analytics"]
end
CO["Client Organization"] --> users
U4 -- Assigned Role --> R1
U5 -- Assigned Role --> R1
R1 -- "Per-product permissions" --> P5["Cloud BMS"] & P1["BBI"] & P2["Data Hub"] & P3["EnerG"] & P4["FDD"]
linkStyle 0 stroke:#00C853,fill:none
linkStyle 1 stroke:#00C853,fill:none
linkStyle 2 stroke:#00C853,fill:none
linkStyle 3 stroke:#FF6D00,fill:none
linkStyle 4 stroke:#FF6D00,fill:none
linkStyle 5 stroke:#FF6D00,fill:none
linkStyle 6 stroke:#FF6D00,fill:none
linkStyle 7 stroke:#FF6D00,fill:none
```
### Permission structure
Permissions are organized into modules and submodules that correspond to KODE OS product areas. Each submodule supports two permission types:
* **Read** -- enables users to view information or access specific features within a module (shown in green in the role editor)
* **Write** -- grants users the ability to modify, create, or delete data and configurations within a module (shown in orange in the role editor)
The permission modules include:
Dashboards, Datasources, Sharings, Templates
Pipelines, Schedule
General, Areas, Dashboards, Datasources, Devices, Miscellaneous, Points, Systems, Tags
General, Assets, Dashboard, Data Sources, Discovery Logs, Notification Policies, Schedule Logs, Schedules, Task Templates, Tasks
Admin, Audit, Connectivity, Dashboards, Deployment Audit, Energy Dashboard, FDD, FTT, Graphics, Marker Icons, Mass Write, MultiTrend, OSS, Schedules
General (Get users, Assign buildings to users, Create users, Delete users)
## Create KODE OS roles
Follow the steps outlined below to create a new `KODE OS` role.
From the left-hand sidebar, open **Apps** and select **KODE OS**.
Within KODE OS, navigate to the **Roles** page.
Click `+Add Role` to start creating a new role.
Enter a **name** and **description** for the role, then define permissions. You can also click `Copy From Another Role` to base the new role on an existing one and modify the permissions as needed.
Three users have access to every product. Within each product, their role's **Read** and **Write** permissions define what they can view and do.
```mermaid actions={false} theme={"theme":{"light":"github-light","dark":"github-dark"}}
---
config:
layout: dagre
theme: neutral
---
flowchart LR
CO["Client Organization"] --> users
subgraph users["Users"]
direction TB
U1["User 1"]
U2["User 2"]
U3["User 3"]
U4["User 4"]
U5["User 5"]
end
subgraph roles["KODE OS Roles"]
direction TB
R1["Admin"]
end
U1 -- "Assigned Role" --> R1
U2 -- "Assigned Role" --> R1
U3 -- "Assigned Role" --> R1
R1 -- "Per-product permissions" --> P1["Cloud BMS"]
R1 -- "Per-product permissions" --> P2["FTT"]
R1 -- "Per-product permissions" --> P3["FDD"]
R1 -- "Per-product permissions" --> P4["OSS"]
R1 -- "Per-product permissions" --> P5["BBI"]
R1 -- "Per-product permissions" --> P6["AssetOps"]
R1 -- "Per-product permissions" --> P7["Data Hub"]
R1 -- "Per-product permissions" --> P8["EnerG"]
linkStyle 1,2,3 stroke:#00C853,fill:none
linkStyle 4,5,6,7,8,9,10,11 stroke:#FF6D00,fill:none
```
Three users have access to reporting, diagnostics, energy, and monitoring products. Within each product, their role's **Read** and **Write** permissions define what they can view and do.
```mermaid actions={false} theme={"theme":{"light":"github-light","dark":"github-dark"}}
---
config:
layout: dagre
theme: neutral
---
flowchart LR
subgraph users["Users"]
direction TB
U1["User 1"]
U2["User 2"]
U3["User 3"]
U4["User 4"]
U5["User 5"]
end
subgraph roles["KODE OS Roles"]
direction TB
R1["Analytics"]
end
CO["Client Organization"] --> users
U4 -- Assigned Role --> R1
U5 -- Assigned Role --> R1
R1 -- "Per-product permissions" --> P5["Cloud BMS"] & P1["BBI"] & P2["Data Hub"] & P3["EnerG"] & P4["FDD"]
linkStyle 0 stroke:#00C853,fill:none
linkStyle 1 stroke:#00C853,fill:none
linkStyle 2 stroke:#00C853,fill:none
linkStyle 3 stroke:#FF6D00,fill:none
linkStyle 4 stroke:#FF6D00,fill:none
linkStyle 5 stroke:#FF6D00,fill:none
linkStyle 6 stroke:#FF6D00,fill:none
linkStyle 7 stroke:#FF6D00,fill:none
```
### Permission structure
Permissions are organized into modules and submodules that correspond to KODE OS product areas. Each submodule supports two permission types:
* **Read** -- enables users to view information or access specific features within a module (shown in green in the role editor)
* **Write** -- grants users the ability to modify, create, or delete data and configurations within a module (shown in orange in the role editor)
The permission modules include:
Dashboards, Datasources, Sharings, Templates
Pipelines, Schedule
General, Areas, Dashboards, Datasources, Devices, Miscellaneous, Points, Systems, Tags
General, Assets, Dashboard, Data Sources, Discovery Logs, Notification Policies, Schedule Logs, Schedules, Task Templates, Tasks
Admin, Audit, Connectivity, Dashboards, Deployment Audit, Energy Dashboard, FDD, FTT, Graphics, Marker Icons, Mass Write, MultiTrend, OSS, Schedules
General (Get users, Assign buildings to users, Create users, Delete users)
## Create KODE OS roles
Follow the steps outlined below to create a new `KODE OS` role.
From the left-hand sidebar, open **Apps** and select **KODE OS**.
Within KODE OS, navigate to the **Roles** page.
Click `+Add Role` to start creating a new role.
Enter a **name** and **description** for the role, then define permissions. You can also click `Copy From Another Role` to base the new role on an existing one and modify the permissions as needed.
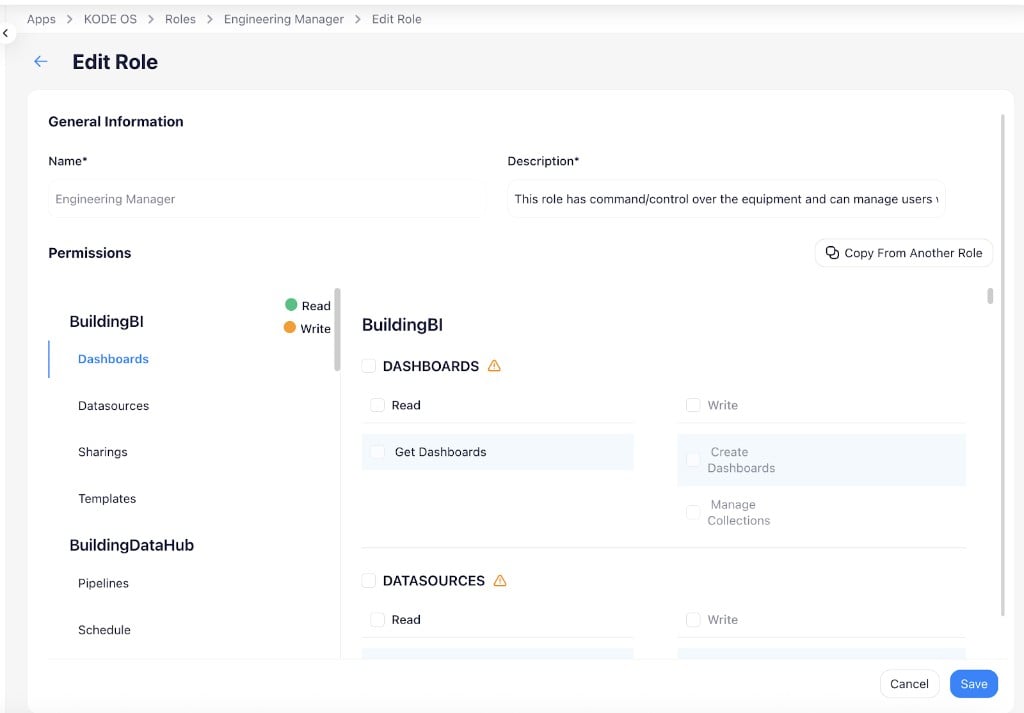 See the [permissions reference](/products/launchpad/client-organizations/apps/permissions-reference) for more details.
Click **Save**. The role is now available when assigning KODE OS to users.
## Edit KODE OS roles
To edit an existing role:
From the Roles page, select the role you want to edit. The role detail page opens.
Click `Edit` to open the role editor. Modify the name, description, or permissions as needed.
Click `Save` to apply the changes. Click `Cancel` to discard them.
Some modules display a warning icon next to their name. Hover over the icon to see which permissions are connected and must be selected together.
## Delete KODE OS roles
To delete a role, select it from the Roles page and click `Delete` on the role detail page. Confirm the deletion in the dialog.
You cannot delete a role if users are still assigned to it. Reassign or remove those users before deleting the role.
## Assign KODE OS roles
Follow the steps outlined below to assign KODE OS and a role to a user.
From the left-hand sidebar, open **Apps** and select **KODE OS**.
Within KODE OS, navigate to the **Users** page.
Click `+Assign User`, select the users, and click `+Assign User(s)` to confirm.
## Configure user management permissions
You can control which roles are allowed to manage users in KODE OS by configuring the **Users > General** permissions within a role. This determines who can view, create, assign, and delete users, and optionally restricts those actions with constraints.
Navigate to **Apps > KODE OS > Roles**, select the role you want to configure, and click `Edit`.
In the Permissions section, scroll down to **Users > General**. You see Read and Write permission options for user management.
See the [permissions reference](/products/launchpad/client-organizations/apps/permissions-reference) for more details.
Click **Save**. The role is now available when assigning KODE OS to users.
## Edit KODE OS roles
To edit an existing role:
From the Roles page, select the role you want to edit. The role detail page opens.
Click `Edit` to open the role editor. Modify the name, description, or permissions as needed.
Click `Save` to apply the changes. Click `Cancel` to discard them.
Some modules display a warning icon next to their name. Hover over the icon to see which permissions are connected and must be selected together.
## Delete KODE OS roles
To delete a role, select it from the Roles page and click `Delete` on the role detail page. Confirm the deletion in the dialog.
You cannot delete a role if users are still assigned to it. Reassign or remove those users before deleting the role.
## Assign KODE OS roles
Follow the steps outlined below to assign KODE OS and a role to a user.
From the left-hand sidebar, open **Apps** and select **KODE OS**.
Within KODE OS, navigate to the **Users** page.
Click `+Assign User`, select the users, and click `+Assign User(s)` to confirm.
## Configure user management permissions
You can control which roles are allowed to manage users in KODE OS by configuring the **Users > General** permissions within a role. This determines who can view, create, assign, and delete users, and optionally restricts those actions with constraints.
Navigate to **Apps > KODE OS > Roles**, select the role you want to configure, and click `Edit`.
In the Permissions section, scroll down to **Users > General**. You see Read and Write permission options for user management.
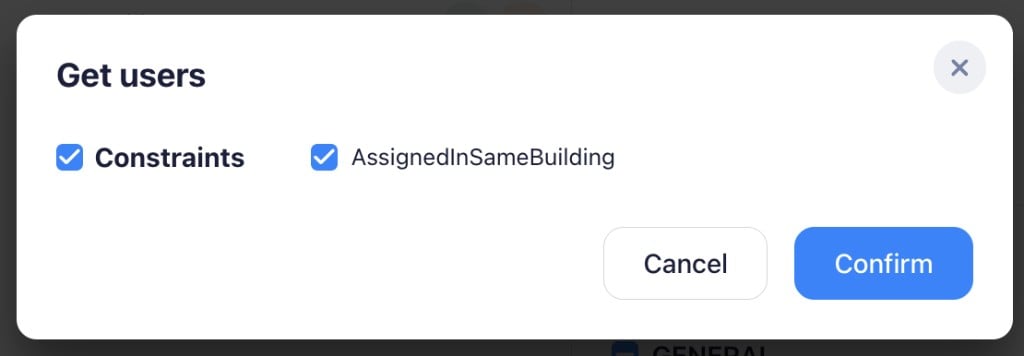
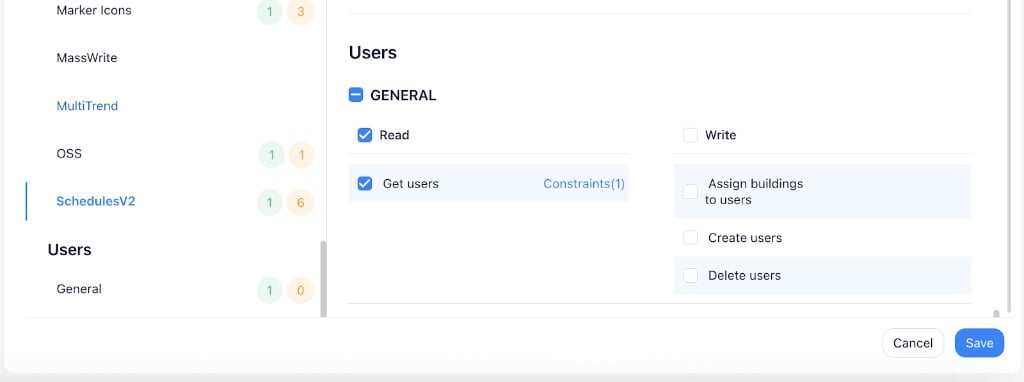 Check **Get users** under Read to allow users with this role to view other users. Click `Constraints` to restrict visibility to users assigned to the same buildings.
 Check the Write permissions to allow user management actions. Each permission can have constraints applied through the `Manage Constraints` link.
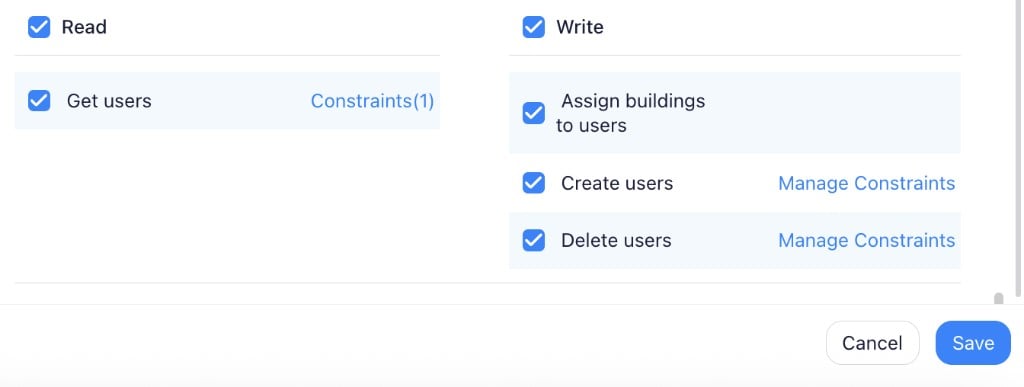 Allows users with this role to assign buildings to other users.
Allows users with this role to create new users. Click `Manage Constraints` to restrict which roles the created users can have.
Allows users with this role to delete users. Click `Manage Constraints` to restrict which roles can be deleted.
For Create users and Delete users, click `Manage Constraints` to specify which roles the current role is allowed to create or delete. Select the `AllowedRoles` constraint and choose the permitted roles from the dropdown.
Allows users with this role to assign buildings to other users.
Allows users with this role to create new users. Click `Manage Constraints` to restrict which roles the created users can have.
Allows users with this role to delete users. Click `Manage Constraints` to restrict which roles can be deleted.
For Create users and Delete users, click `Manage Constraints` to specify which roles the current role is allowed to create or delete. Select the `AllowedRoles` constraint and choose the permitted roles from the dropdown.
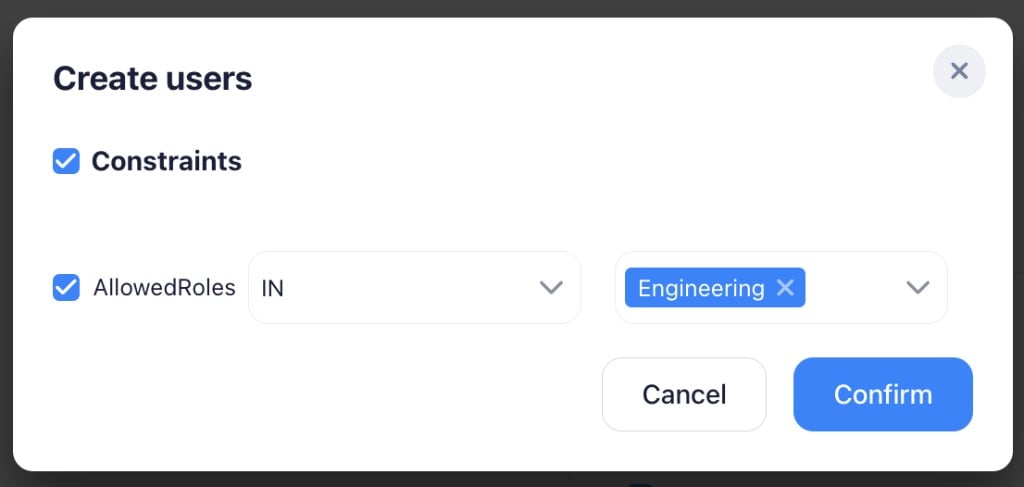 Click `Save` to apply the user management permissions for this role.
## Role constraints
Beyond Read and Write permissions, KODE OS roles can include constraints that limit scope and visibility. Constraints appear next to eligible permissions in the role editor.
Common constraint examples include:
| Constraint focus | What it controls |
| ------------------- | ---------------------------------------------------------------------- |
| Assigned buildings | Whether the user sees all buildings or only buildings assigned to them |
| Published buildings | Whether the user sees all buildings or only published buildings |
| Override duration | Maximum override duration when the role is allowed to override points |
| Module visibility | Whether a module appears at portfolio level, building level, or both |
| Client-facing views | Whether certain client-facing views are hidden for the role |
A Super Admin role typically sees all buildings regardless of individual assignment. A role limited to assigned buildings requires building assignment before those sites appear in KODE OS.
Changes to a role apply to every user assigned to that role. Launchpad Admins can change their own KODE OS role when they need to validate permissions.
Click `Save` to apply the user management permissions for this role.
## Role constraints
Beyond Read and Write permissions, KODE OS roles can include constraints that limit scope and visibility. Constraints appear next to eligible permissions in the role editor.
Common constraint examples include:
| Constraint focus | What it controls |
| ------------------- | ---------------------------------------------------------------------- |
| Assigned buildings | Whether the user sees all buildings or only buildings assigned to them |
| Published buildings | Whether the user sees all buildings or only published buildings |
| Override duration | Maximum override duration when the role is allowed to override points |
| Module visibility | Whether a module appears at portfolio level, building level, or both |
| Client-facing views | Whether certain client-facing views are hidden for the role |
A Super Admin role typically sees all buildings regardless of individual assignment. A role limited to assigned buildings requires building assignment before those sites appear in KODE OS.
Changes to a role apply to every user assigned to that role. Launchpad Admins can change their own KODE OS role when they need to validate permissions.