Sign in to Launchpad, manage your account and organizations, open applications from the landing page, and configure authentication
Every user accesses Launchpad through a workspace, a dedicated environment tied to their organization. This page covers sign-in, the Launchpad landing page, account activation, password management, and multi-factor authentication (MFA).
When an administrator adds you to an organization, you receive an email invitation with an activation link. Complete the following steps to set up your account.
1
Open invitation email
Locate the invitation email in your inbox and click Set Password. The password link expires after 24 hours.
The welcome email confirms your organization, app access, sign-in methods, and provides mobile app download links
2
Set password
Enter a password that meets your organization’s security requirements, then confirm it by entering it a second time. Accept the privacy policy, then click Set Password to complete activation.KODE rejects commonly used passwords even when they meet complexity rules. Your organization may also enforce Medium, High, or Custom complexity in Security settings.
The Setup Password page prompts you to enter and confirm your new password
3
Complete activation
Click Save to finalize your account setup. You can now sign in to your workspace.
If the activation link has expired, go to your workspace sign-in page, select Forgot Password, and enter your email address to receive a new reset link. The reset link expires after one hour.
The password reset email contains a Reset Password button that expires after one hour
If your welcome email lists an SSO method such as Azure AD, sign in with that IdP button. Do not wait for a separate password email.
Open your workspace address in a browser. The sign-in screen appears.
2
Enter credentials
Enter your username (email address) and password.
3
Open Launchpad
Select Login with Email. If you belong to more than one organization, select the instance you want after sign-in. The Launchpad landing page loads when authentication succeeds.
The sign-in page includes a Forgot password link, and the Forgot Password page prompts for your email to receive a reset link
If you belong to two or more organizations, you use the same email and password for each. Launchpad prompts you to choose an organization after sign-in. You can also switch organizations anytime from the Organizations page in the account portal.
If email and password fail after an invite, check your active sign-in method with an administrator. Many workspaces require Azure AD or another SSO option instead of a KODE password.
Launchpad supports an additional sign-in verification step through MFA. You can enable MFA for your account from Manage Account in the profile menu using Text message (SMS) or a third-party authenticator app. See Enable 2FA.Organization administrators can enforce MFA and set frequency rules in Security settings.
After you sign in, the Launchpad landing page lists the applications you can open. This view is your central entry point to KODE products. It does not control permissions; access to each product still follows your assigned roles.
Launchpad landing page with Quick Access to Apps and Open App actions
The page shows which organization you are working in (for example, ZEN Estate) and a Quick access to apps list.
Use the apps list to confirm which Launchpad level you are in:
Level
Apps you typically see
Channel partner
Channel Management only
Client organization
Client Management and, when assigned, KODE OS
If you see KODE OS on the landing page, you are in a client workspace. Buildings are created in the client environment. Product enablement for those buildings is managed from the channel partner workspace.
The landing page shows applications you are allowed to open. Your list depends on product enablement and your permissions. Common applications include:
Application
Description
Channel Management
Launchpad administration for channel partners (clients, channel users, product enablement)
Client Management
Launchpad administration for client organizations (buildings, users, apps)
KODE OS
Cloud-based smart building operating system
AssetOps
Asset and maintenance operations
myMSI
Legacy MSI project and device linking workflows
EnerG
Energy planning and sustainability (when enabled for your organization)
Open App takes you directly into the selected product environment. Launchpad acts as navigation only; it does not gate permissions inside each product.
Application
Example path after Open App
AssetOps
{your-company-name}.kodelabs.com/bms/maintenance
Replace {your-company-name} with your organization subdomain. Other products use their own paths under the same domain.
Access to each application is managed by existing user permissions in that product. The landing page is a navigation hub, not the access control layer.
If Quick access to apps is empty after sign-in, ask an administrator to assign the KODE OS app, a role, and buildings on your user record. A Launchpad Admin role manages Launchpad only. It does not grant KODE OS access by itself.
A workspace is a dedicated Launchpad environment assigned to your organization. It serves as the central location where you manage users, applications, settings, and all other resources tied to that organization.You receive your workspace address during provisioning. Use the sign-in steps above to open it.
To access your account settings, select your profile icon in the upper-right corner of Launchpad and choose Manage Account. The account portal has four sections: Organizations, Account, Activity, and Invitations.
The profile menu provides access to profile editing, account management, organization switching, invitations, and sign out
For account details, sign-in history, and invitations, see Accounts and users.
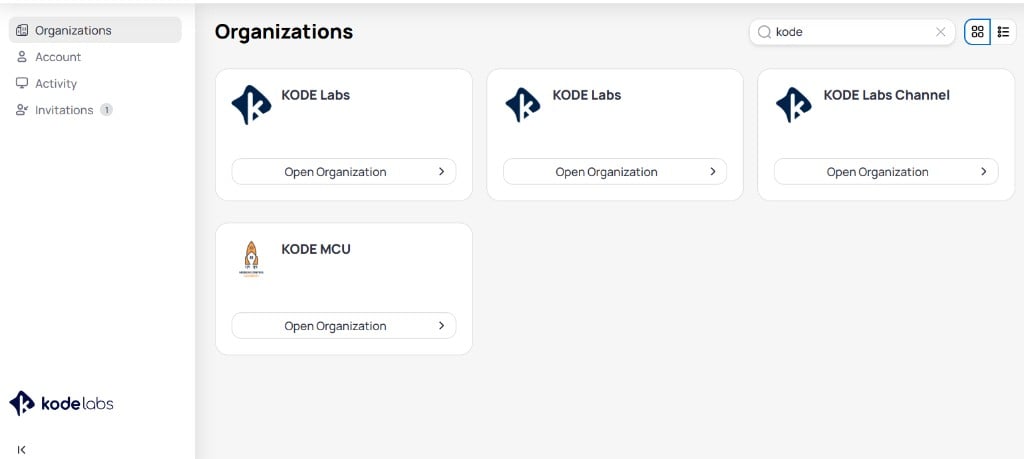
The Organizations page lists every workspace tied to your account. Use it after sign-in or when you need to switch to another organization.Each organization appears as a card with its logo and name. Select Open Organization on a card to enter that workspace and return to the Launchpad landing page for that instance.Use the search field to filter organizations by name. Toggle between grid view and list view using the icons in the upper-right corner of the page.
The Organizations page lists all workspaces associated with your account, with an option to open each one
Use the appropriate process below depending on whether you’ve forgotten your password or want to update it while signed in.
Forgot password
Change password
Use this process if you can’t remember your current password and need to create a new one.
1
Open sign-in page
Navigate to your Launchpad access URL in a browser. Select Forgot password? below the password field. The Forgot Password page appears.
2
Request reset link
Enter your email address and click Reset Password. You receive an email with a reset link.
3
Reset password
Open the password reset email, click Reset Password, and set a new password. After saving, return to the sign-in page and log in with your updated credentials.
Use this process to change your password while you are already signed in.
1
Open Manage Account
Click your profile icon in the upper-right corner of Launchpad and select Manage Account.
Select Manage Account from the profile menu to access your account settings
2
Edit password
On the Account page, locate the Password section and click Edit. The Change Password dialog appears.
The Account page shows General Information, Password section, and Two-factor authentication options
3
Change password
Enter your old password, then enter and confirm your new password. Click Save.
The Change Password dialog prompts for your old password, new password, and confirmation
Multi-factor authentication (MFA) adds an extra layer of security to your account by requiring a second verification step in addition to your password. Even if someone obtains your password, they cannot access your account without this second factor. Launchpad supports two methods: Authenticator App and SMS.
Authenticator App
Text Message (SMS)
The Authenticator App method generates time-based one-time codes using a mobile app such as Google Authenticator, Microsoft Authenticator, or Authy. These codes refresh every 30 seconds and do not rely on mobile network availability.
1
Open Manage Account
Click your profile icon in the upper-right corner of Launchpad and select Manage Account.
Select Manage Account from the profile menu to access your account settings
2
Select Authenticator App
On the Account page, locate the Two-factor authentication section and click Authenticator App.
The Account page shows the Two-factor authentication section with Authenticator App and Text Message options
3
Scan the QR code
Open your authenticator app on your phone (Google Authenticator, Microsoft Authenticator, Authy, or similar). Scan the QR code displayed on screen, or enter the setup key manually if your app supports it.
4
Enter the code and enable
Enter the current 6-digit code from your authenticator app and click Enable.
The Enable Authenticator App dialog displays a QR code, setup key, and a field to enter the 6-digit verification code
Once enabled, you enter a new code from the app each time you sign in.
SMS authentication sends a one-time verification code to your registered mobile number each time you sign in. This method is convenient but depends on mobile network access.
1
Open Manage Account
Click your profile icon in the upper-right corner of Launchpad and select Manage Account.
2
Select Text Message (SMS)
On the Account page, locate the Two-factor authentication section and click Text Message (SMS).
The Account page shows the Two-factor authentication section with Text Message SMS highlighted
3
Enter phone number and get code
Select your Country Code, enter your Phone Number, and click Get Code.
The Enable Text Message dialog prompts for your phone number and sends a verification code via SMS
4
Enter the code and enable
Check your phone for an SMS containing a 6-digit verification code. Enter the code in the field and click Enable. Two-factor authentication is now active for your account.
Last modified on August 18, 2026
Was this page helpful?
Assistant
Responses are generated using AI and may contain mistakes.