Asset discovery lets you import and onboard assets at the building level. You define a data source from an Excel template, then run discovery to add assets to the building. Open a building from Buildings, then select Asset discovery in the building sidebar. Use the secondary navigation:
  • Data sources — Upload and manage import files
  • Discovery logs — Run discovery and review results
  • ConfigurationsField mapping and matching rules
  • Asset linking — Merge duplicate assets into one record

Concepts and rationale

Asset linking associates newly discovered assets from data sources with existing assets in your building. When multiple discovery sources (BMS, CMMS, IoT sensors) detect the same physical device, linking keeps one record so the database stays accurate and free of redundant entries. Asset linking provides these capabilities: Configure field mapping and matching before you link assets. Merged asset fields follow mapping priorities. Duplicate checks use profiling-driven fields and the match configuration you accept or adjust.

Linking constraints

An asset cannot link to another asset that originates from the same external source. This rule prevents circular references and keeps data logic consistent in your asset database.

Data sources

View data sources

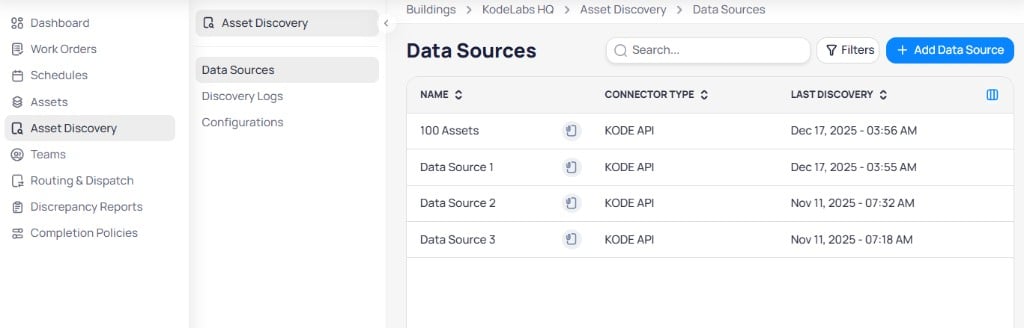
Asset Discovery Data Sources table with Name, Connector Type, and Last Discovery columns plus Add Data Source button

The Data sources page lists each source with connector type and last discovery time

Use Search and Filters to find sources. Select + Add data source to upload a new file.

Add a data source

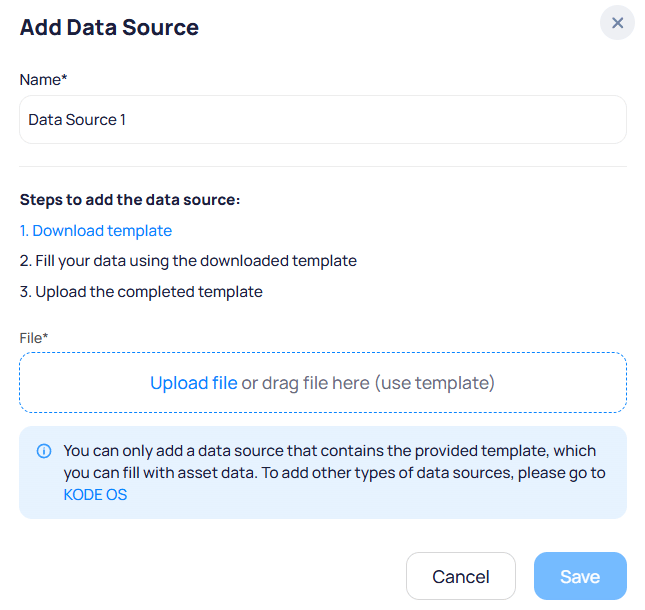
Add Data Source modal with Name field, template download steps, and file upload area

Download the template, fill asset data, and upload the completed file

1

Open Data sources

Navigate to Asset discovery > Data sources.
2

Select + Add data source

Select + Add data source.
3

Download and complete the template

  1. Download the asset import template.
  2. Fill in asset data using the template columns.
  3. Upload the completed .xlsx file in the File field.
4

Save

Enter a Name for the data source and select Save.
Uploaded sources use the provided template format. To connect other connector types, configure integrations in Cloud BMS.

Discover assets from a data source

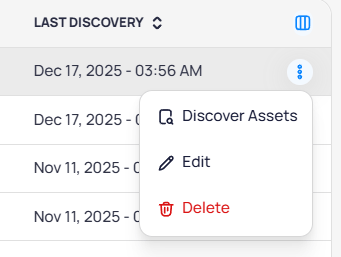
Open the row menu on a data source and select Discover assets to start discovery without opening Discovery logs first.
Data source row menu with Discover Assets, Edit, and Delete options

Use the row menu to discover assets, edit, or delete a data source


Discovery logs

View discovery logs
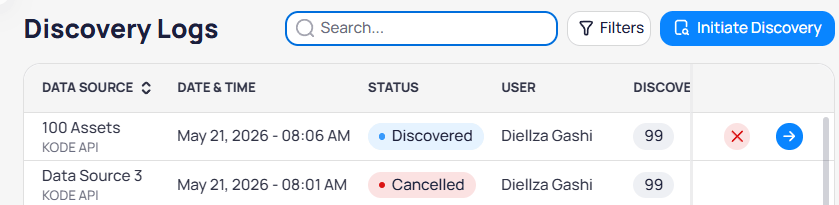
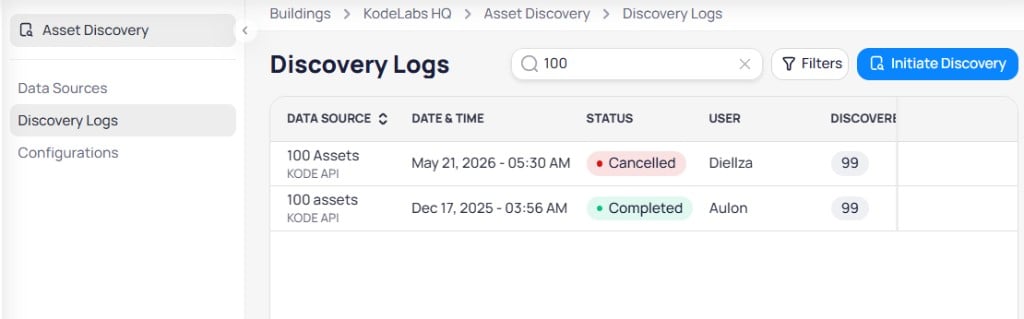
Discovery Logs table with Data Source, Date and Time, Discovered and Cancelled status badges, User, Discovered count, and row actions

Discovery logs list each run with status badges and actions to open results

Row actions:
  • Select the arrow icon to open Results: Asset Discovery for that run
  • Select the X icon to cancel or remove the log entry when available
Use Search and Filters to find runs. Select Initiate discovery to start a new run.

Initiate discovery

Select Initiate discovery to open the discovery dialog.
Initiate Discovery modal with Choose Data Source dropdown and Initiate Discovery button

Choose a data source and start discovery

1

Open Discovery logs

Navigate to Asset discovery > Discovery logs.
2

Select Initiate discovery

Select Initiate discovery.
3

Choose data source

Select the Data source to discover, then select Initiate discovery.
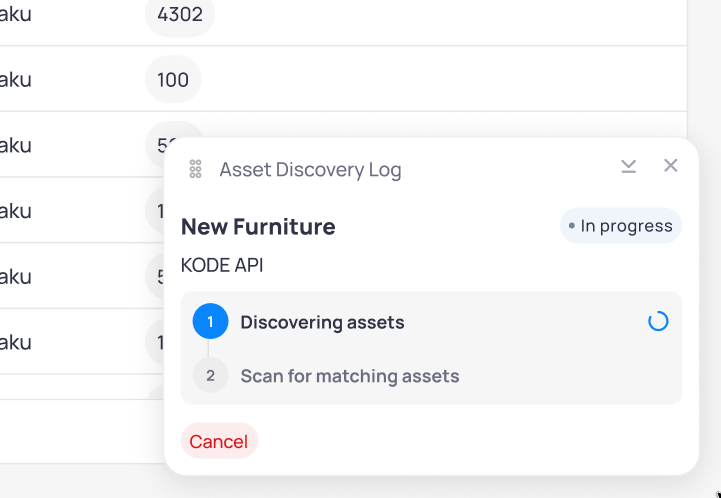
While discovery runs, the Asset Discovery Log shows progress for the selected source. The log walks through Discovering assets, then Scan for matching assets, so matching starts as part of the same run.
Asset Discovery Log popup for New Furniture via KODE API showing Discovering assets in progress and Scan for matching assets as the next step

Asset Discovery Log tracks discovering assets and the matching scan

Review discovery results

When discovery completes, select the arrow on the log row to open Results: Asset Discovery. The header shows the data source name and connector type (for example, 100 Assets - KODE API). Two tabs organize results: Use Search, Filters, and row checkboxes to work with the list. Select Done to exit without saving changes.

Add new assets

On the New assets tab, select assets to import.
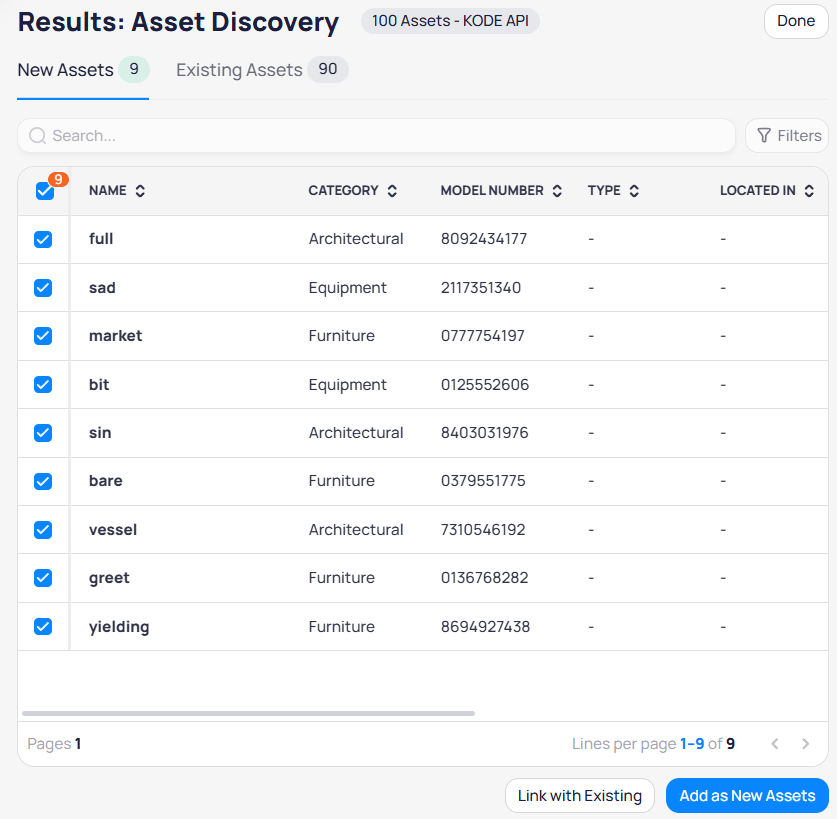
Results Asset Discovery New Assets tab with selected rows and Link with Existing and Add as New Assets buttons

New assets tab with Link with Existing and Add as New Assets actions

Link with existing
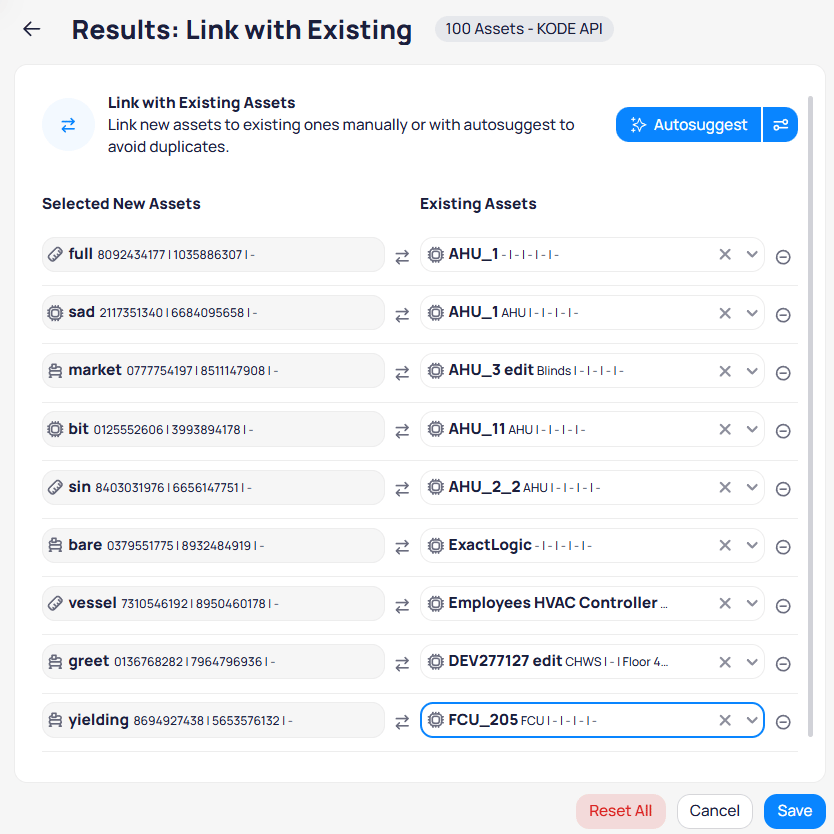
Select Link with existing to open the Link with existing assets page. You can link with autosuggest or manually.
You can select up to 50 assets at a time for linking.
Link with Existing screen showing Selected New Assets paired with Existing Assets dropdowns and Autosuggest button

Map each new asset to an existing building asset manually or with autosuggest

The page has two sides:
  • Selected new assets — Discovered records you selected on the left
  • Existing assets — Dropdown on the right for each building asset to link to
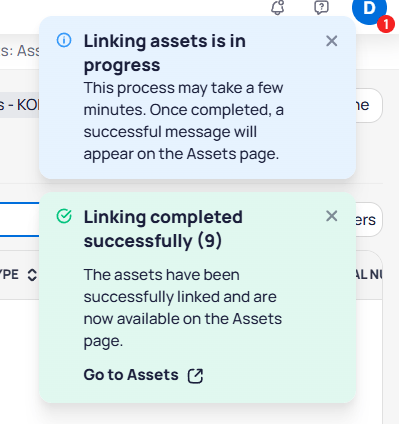
Use Reset all to clear mappings, Cancel to exit without saving, or Save to confirm links. Merged fields follow field mapping priorities.
Linking assets in progress and Linking completed successfully toasts with Go to Assets link

Toast notifications show linking progress and completion with link to Assets

When linking finishes, Linking completed successfully shows how many assets linked. Select Go to Assets to open the Assets list.

Update existing assets

On the Existing assets tab, select records to update with values from the discovery run.
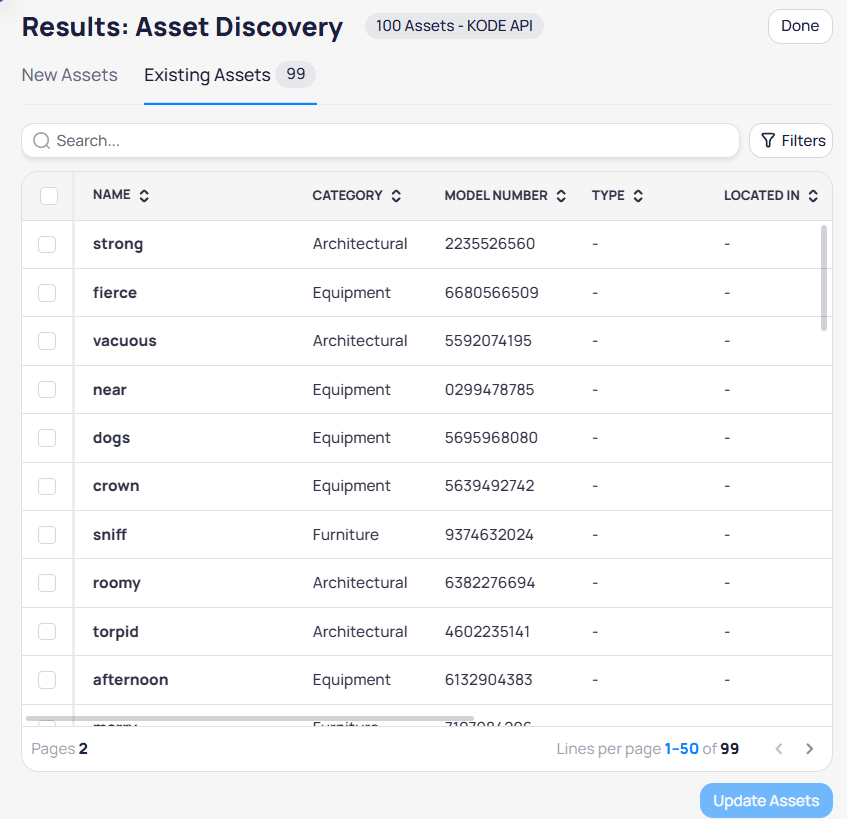
Results Asset Discovery Existing Assets tab with Name, Category, Model Number, Type, and Located In columns and Update Assets button

Existing assets tab lists matched assets with Update Assets action
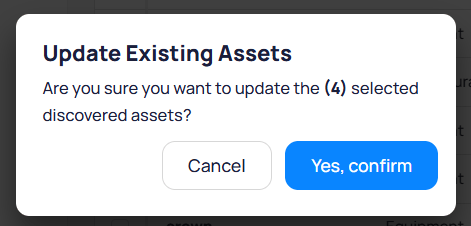
Select Update assets to apply field values from discovery to the selected building assets. A confirmation dialog shows how many assets you selected.
Update Existing Assets modal asking to confirm updating four selected discovered assets

Confirm before updating discovered values on existing building assets

Select Yes, confirm to apply updates, or Cancel to return to the results screen. Updated assets reflect field mapping priorities when multiple sources supply the same field.

Configurations

Configurations control how discovery maps and matches imported assets. Set up configurations before you run discovery and link assets so field updates and duplicate checks behave predictably. Select Asset discovery > Configurations in the building sidebar. The page has two tabs: Field mapping and Matching rules.

Field mapping

Field mapping defines which data source is the primary source of truth for each asset field (name, serial number, location, and others). For every field, you maintain a priority list of data sources. When two assets link, AssetOps fills each field with the highest-priority value that exists between the linked records. If a field has no sources in its priority list, that field is not updated during linking.
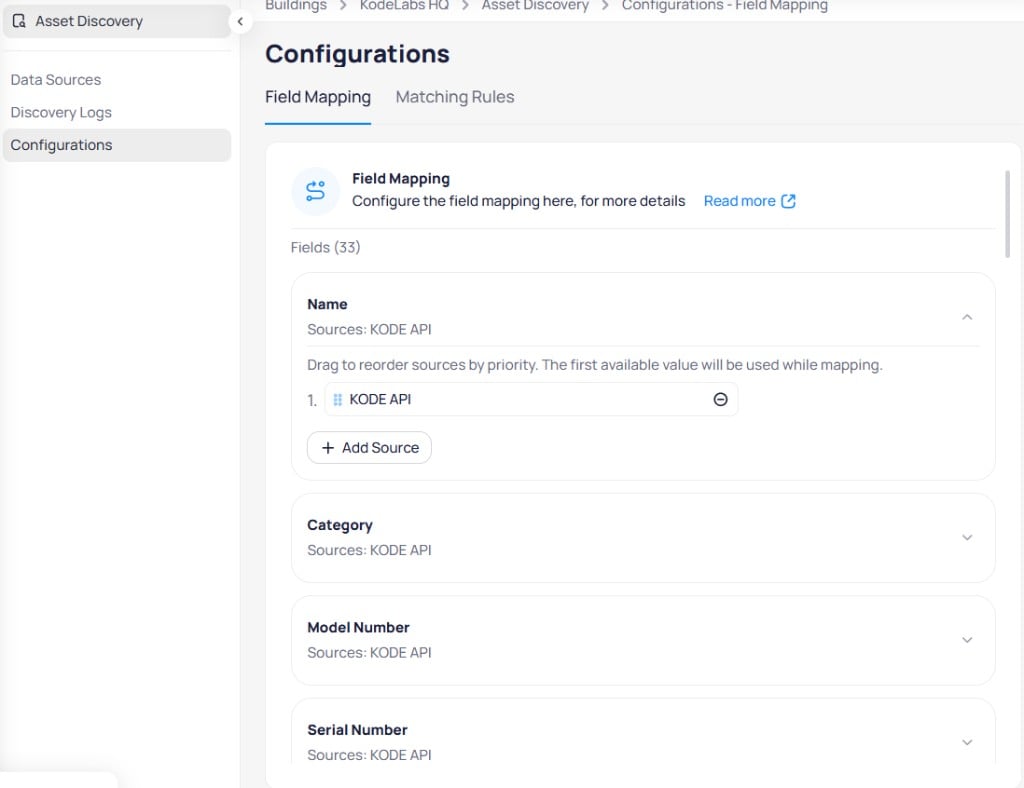
Configurations Field Mapping tab showing Name field expanded with KODE API source priority and Add Source button

Field mapping lists 33 asset fields with expandable source priority per field

1

Open Field mapping

Navigate to Asset discovery > Configurations and stay on the Field mapping tab.
2

Expand a field

Select a field card to expand it and view current source priorities.
3

Add a source

Select + Add source. In the Add source dialog, choose a data source from the dropdown, then select Save. The source appears in the field list.
4

Set priority

Drag sources to reorder priority. The system uses data from the highest-priority source that has a value between the linked assets.
Remove a source with the minus icon when it should no longer apply to that field. After you upload a template in Data sources, fields typically show KODE API as the source.

Mappable fields (33)

AssetOps supports field mapping for these asset attributes:

Matching rules

Matching configuration drives automatic and manual duplicate checks. Profiling inspects completeness, uniqueness, and how fields are shared across sources, then recommends fields and match settings for the site. Strong identifiers are preferred when the data supports them. Blank or generic values (for example, N/A, 0.0.0.0, or 00:00:00:00:00:00) are ignored. The matching engine compares identifiers and names across common formatting differences (spaces, hyphens, underscores, and reordered tokens). Suggestions include a match score so stronger candidates surface first. Each matching rule contains up to three conditions. Every condition must be true for the rule to suggest a link. One rule must be the default so automatic and on-demand checks always have a baseline configuration.
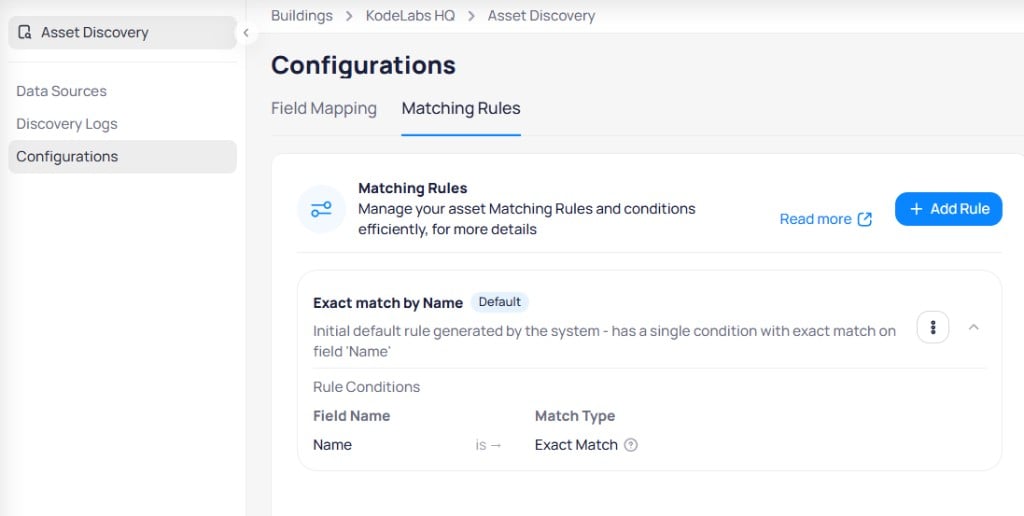
Configurations Matching Rules tab showing Exact match by Name default rule with Field Name and Match Type columns

Matching rules list default and custom rules with conditions

Match types

Default rule

The system creates a default rule with a field and match type for baseline checks. Duplicate checks use the default when you do not select another rule. Profiling may suggest different fields for a given site; accept or adjust those suggestions when you run a manual check.
A default matching rule must always exist and cannot be deleted. Duplicate checks require a default rule to run.

Create a matching rule

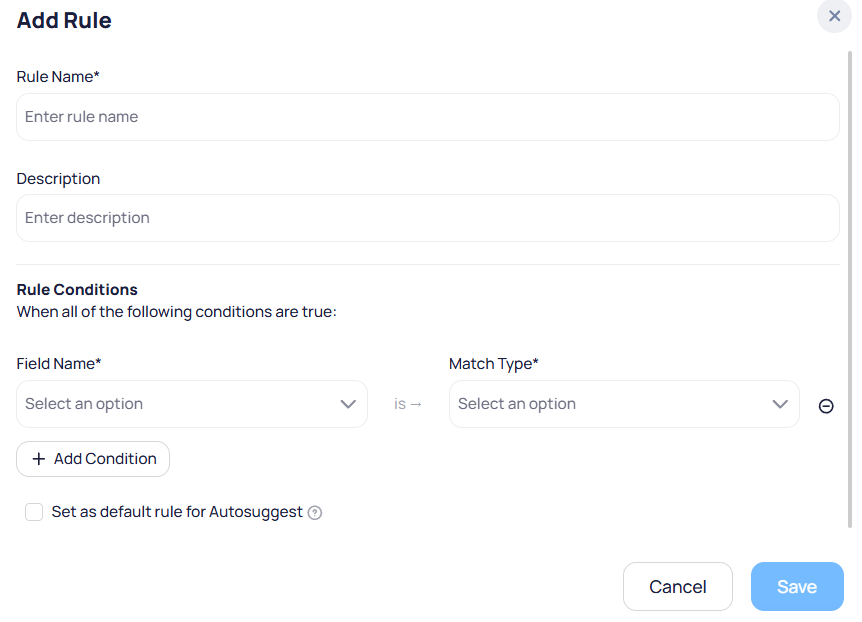
Add Rule modal with Rule Name, Description, Rule Conditions with Field Name and Match Type dropdowns, and Set as default rule for Autosuggest checkbox

Define rule name, description, and conditions with field and match type

1

Open Matching rules

Navigate to Asset discovery > Configurations and select the Matching rules tab.
2

Select + Add rule

Select + Add rule in the upper right corner.
3

Enter rule details

Enter a unique Rule name and Description.
4

Add conditions

For each condition, set Field name (for example, serial number) and Match type. Select + Add condition for up to three conditions total. Use profiling suggestions when they appear so you prioritize fields with strong coverage for this data source.
5

Save the rule

Select Save. Enable Set as default rule for autosuggest if this rule should become the default.

Designate a default matching rule

1

Open the rule menu

In the matching rules list, select the three-dot menu on the rule row.
2

Edit the rule

Select Edit.
3

Set default

Enable Set as default rule for autosuggest, then select Save.
You can also enable Set as default rule for autosuggest when you create a new rule.

Edit a matching rule

1

Open the rule menu

Select the three-dot menu on the rule row, then select Edit.
2

Update and save

Change rule settings as needed, then select Save. Select Cancel to discard changes.

Delete a matching rule

1

Open the rule menu

Select the three-dot menu on the rule row, then select Delete.
2

Confirm deletion

In the Delete matching rule dialog, select Delete to confirm or Cancel to keep the rule.
You cannot delete the default matching rule.

Asset linking

Link newly discovered assets with existing building assets to merge information and prevent duplicate entries. See Concepts and rationale for how duplicate checks, scored suggestions, confirmation, and manual linking work together. Discovery starts an automatic duplicate check when assets are ingested. You can also run checks on demand for selected items or the full result set. You can start linking from the New assets tab in Review discovery results, or select Asset discovery > Asset linking in the building sidebar. Use Autosuggest to fill Existing assets on the right from the duplicate check. The review list highlights the best match for each discovered asset. Expand a row to see alternative scored candidates when the top suggestion is wrong. Filter by match score, category, type, or area to focus the list. Confirm high-confidence links in bulk, then save.
Link with Existing screen showing selected new assets on the left, existing asset dropdowns on the right, and Autosuggest button in the header

Link with existing assets page with Autosuggest and per-row existing asset dropdowns

1

Open discovery results

Navigate to Asset discovery > Discovery logs. Run Initiate discovery or open a completed log with the arrow icon to reach Results: Asset Discovery on the New assets tab.
2

Select assets

Select discovered assets to link. You can limit the selection to run a check on selected items only. Link with existing becomes active.
3

Open Link with existing

Select Link with existing. The Link with existing assets page opens with selected new assets on the left and existing asset fields on the right.
4

Run Autosuggest or configure the check
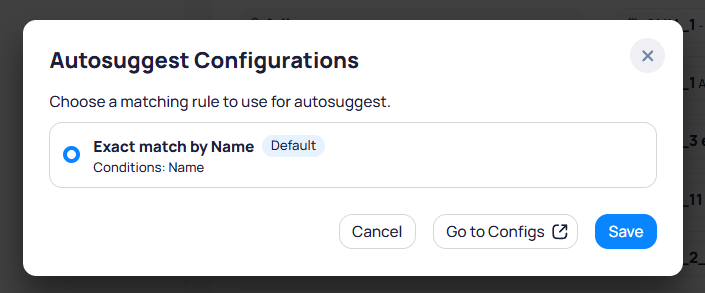
Select Autosuggest to run with the current configuration. To choose fields or a rule, open the configuration next to Autosuggest, review profiling suggestions, pick a matching rule or fields, then select Save. If you do not change the configuration, the default matching rule applies.
Autosuggest Configurations modal with Exact match by Name default rule and Go to Configs button

Autosuggest configurations modal to pick a matching rule or open Configurations

5

Filter and review suggestions

Filter suggestions by score range (for example, above 90%), category, type, or area. Review the highlighted best match on each row. Expand alternatives when you need a different candidate. Adjust any mapping with the existing asset dropdown.
6

Run the check again when needed

If matches look weak, run the duplicate check again. Profiling identifies which fields have the strongest coverage for the data source so the next check can use better criteria.
7

Save or pause

Select Save to confirm links. Linked asset fields update using field mapping priorities. Use Close for now to leave the session and finish linking later. Use Reset all to clear mappings, or Cancel to exit without saving.
After you confirm links in bulk, linked assets leave the New assets list. Use manual linking when scored suggestions do not fit or you need precise control. For each new asset on the left, search and select the correct building asset from the Existing assets dropdown on the right. Filters on the existing-asset picker narrow the inventory so you do not search the full building list.
Link with Existing screen with new assets on the left and Existing Assets dropdown fields on the right for manual pairing

Manually map each new asset to an existing asset using the Existing assets dropdown

1

Open discovery results

Navigate to Asset discovery > Discovery logs. Open Results: Asset Discovery on the New assets tab.
2

Select assets

Select assets, then select Link with existing.
3

Map each pair

For each new asset on the left, select the matching existing asset from the dropdown on the right. Use search and filters on the picker when the list is large.
4

Save links

Select Save to link the assets. Fields update per field mapping. Use Close for now, Reset all, or Cancel as needed.
After linking, verify merged fields on the Assets page and in the asset Sources tab.

Assets

View and manage assets after discovery completes.
Last modified on August 19, 2026