At the building level, Work orders is the hub for planned and unplanned maintenance. Open a building from Buildings, then select Work orders in the sidebar. When AssetOps is enabled, you can also open Work orders from the KODE OS building sidebar without leaving KODE OS. Work orders can come from corrective requests, schedules, or integrations. Learn how work types differ in Work order basics.

Work order list

The work orders page shows status summary cards, a searchable table, and actions to create or manage work.
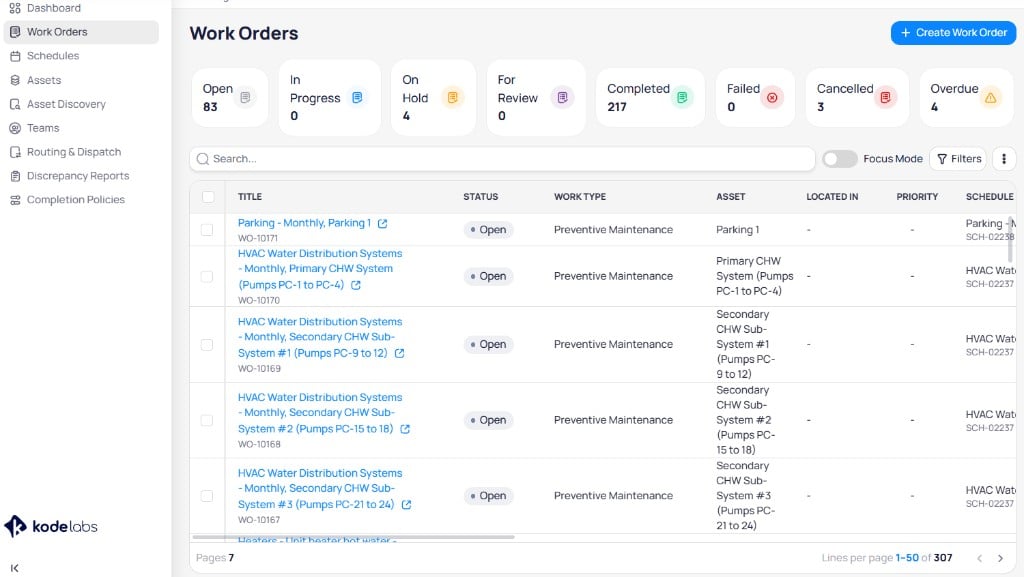
Building Work Orders page with status summary cards, Focus Mode toggle, search bar, and work order table

Work orders list with status cards, Focus mode toggle, search, and table columns

Status summary cards

Select a card to filter the table by that status. Counts update based on your current filters.

List actions

  • Search — Filter the table by text across visible fields
  • Focus mode — Toggle to show only urgent work. See Focus mode.
  • Filters — Open custom filter criteria. See Custom filters.
  • + Create work order — Start a new work order. See Create a work order.
  • Edit and Delete — Available when you select one or more rows
  • Vertical ellipsis menu — Additional list actions such as Export
Select row checkboxes to enable bulk Edit or Delete. See Bulk edit work orders.

Export

Open the vertical ellipsis menu in the list header and select Export to download work order data.

Work orders table showing Title with WO ID, Status, Work Type, Asset, Located In, Priority, and Schedule columns

Work order table columns include title, status, work type, asset, and schedule with horizontal scroll for more fields

Use the column control at the right edge of the header row to show or hide columns. Scroll horizontally to view fields that do not fit on screen.

Table columns

Select a Title link to open the work order detail page.

Focus mode

Focus mode is a preset view on the work orders list. It shows work orders that require immediate attention, including: Enable the Focus mode toggle on the work orders list to limit the table to these items. Turn the toggle off to return to the full list. Combine Focus mode with status summary cards or custom filters when you need a narrower view.

Custom filters

Custom filters narrow the list using field-based criteria.
1

Open the filter panel

On the work orders list, select Filters.
2

Select criteria

Choose one or more filters.
3

Apply

Select Apply to update the table.
Combine status cards and custom filters for precise views. For example, filter In progress work in the HVAC category.

Bulk edit work orders

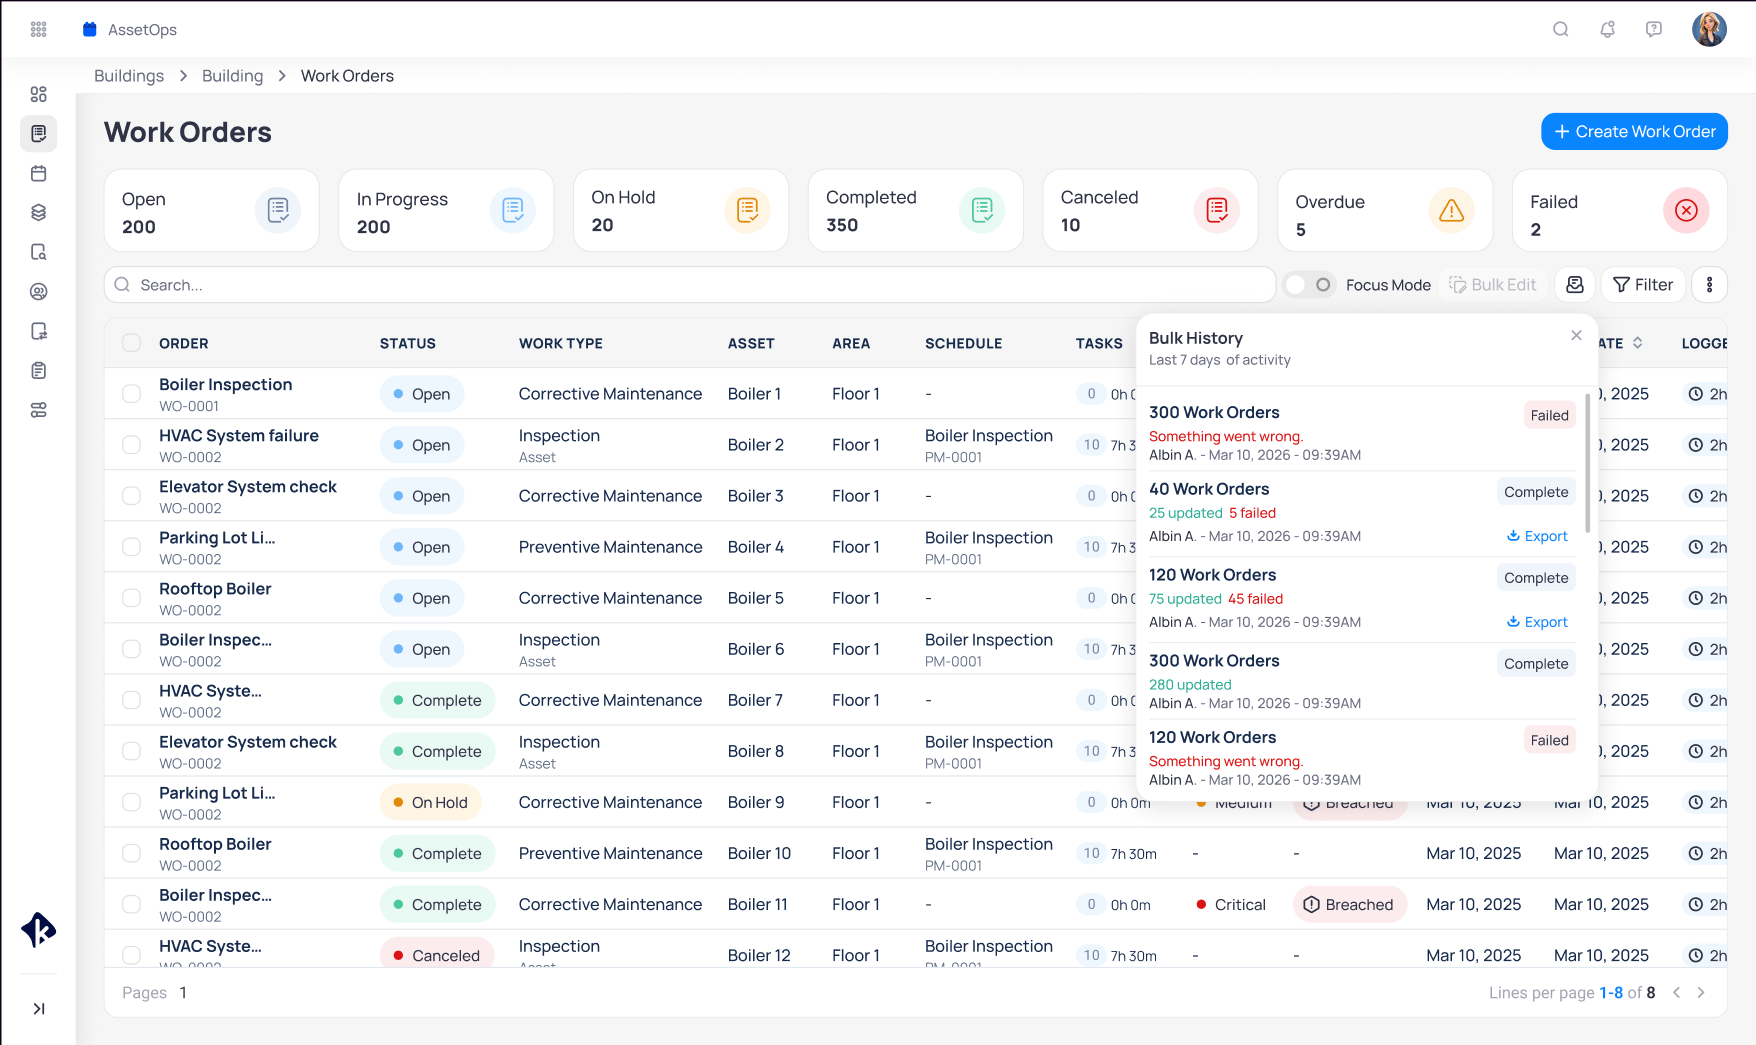
Update multiple work orders at once from the list at the building or portfolio level. Bulk updates run as a batch: AssetOps processes each selected work order individually. Valid items complete even when some rows fail. Failed rows stay available to review and export with the failure reason (for example, an invalid status transition, a permission restriction, or a field restriction). When you start a batch, a popup confirms that processing started. If another bulk update is already running, the new job is queued. A badge shows whether the batch finished fully or stopped because of an interruption such as a network error. Review bulk activity for the last seven days in the building Bulk History. Each entry shows who triggered the update, how many items succeeded, and how many failed. Export the failure report from the history view to inspect row-level errors.
Work Orders page with Bulk History panel listing complete and failed bulk updates for the last seven days

Bulk History shows the last seven days of batch updates with status, counts, and export

1

Select work orders

Use row checkboxes or the header checkbox to select work orders. Edit and Delete appear in the toolbar.
2

Open bulk edit

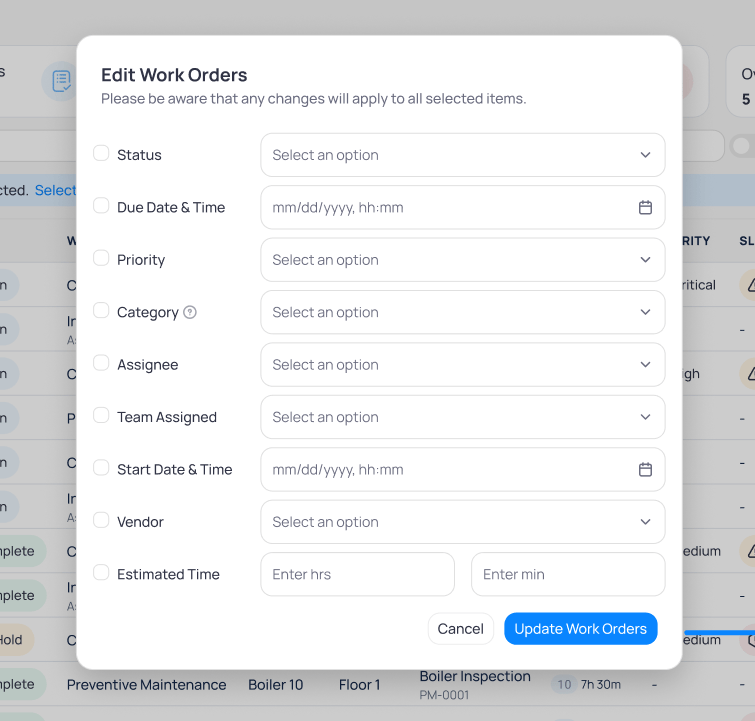
Select Edit to open the Edit Work Orders modal.
Edit Work Orders dialog with checkboxes for Status, Due Date and Time, Priority, Category, Assignee, Team Assigned, Start Date and Time, Vendor, and Estimated Time

Edit Work Orders applies only the fields you check to every selected row

3

Choose fields and save

Enable the checkbox for each field you want to change, enter values, then select Update Work Orders. The batch applies checked fields to each selected work order that passes validation.
4

Review results

Confirm the batch status in the progress popup. Open the seven-day Bulk History to export failed items and read failure reasons.
Bulk Delete permanently removes selected work orders and cannot be undone. Review your selection before you delete.
Dropdown
Lifecycle status for selected work orders. Supports bulk completion when the status transition is valid.
Date
Target due date and time for selected work orders.
Dropdown
Priority level for selected work orders.
Dropdown
User assigned to the selected work orders.
Dropdown
Team assigned to the selected work orders.
Date
Completion date for selected work orders. Use when completing work in bulk, including HSSE workflows.
Field
Optional note recorded with a status change.

Create a work order

Create corrective and other generic work orders for assets or areas. Routing and dispatch can assign teams automatically when you select a category and issue type.
1

Select + Create work order

On the work orders list, select + Create work order.
2

Configure general details

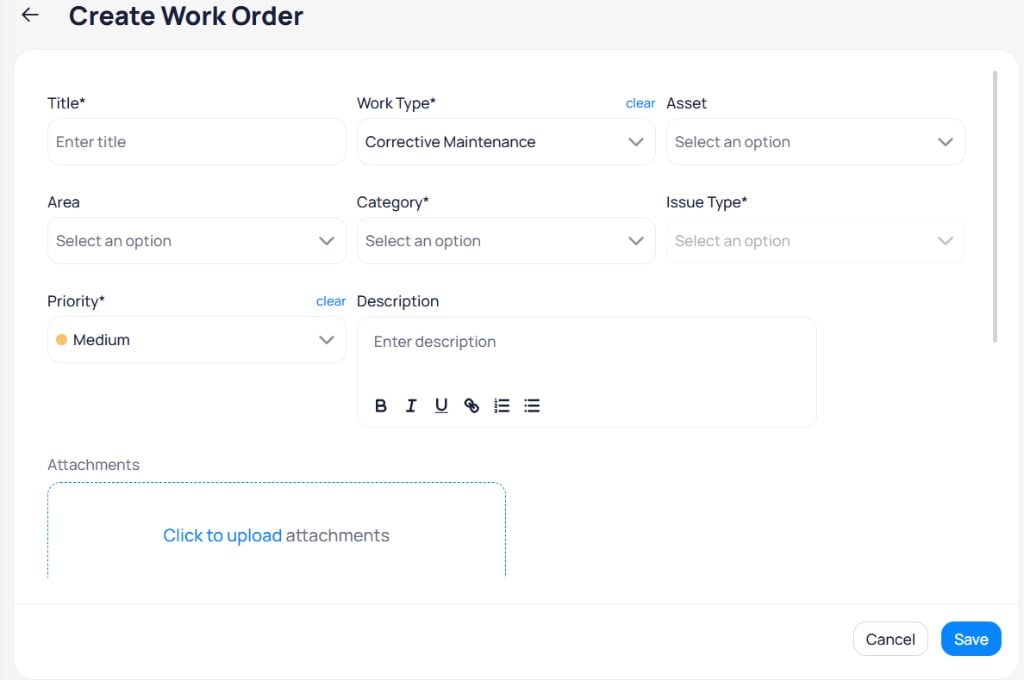
Complete required fields.
Create Work Order form with Title, Work Type Corrective Maintenance, Asset, Area, Category, Issue Type, Priority, Description, and Attachments upload

Create work order form with title, work type, asset, category, priority, and description

Field
required
Work order name.
Dropdown
required
Program type (for example, corrective maintenance).
Dropdown
Asset the work applies to. Leave blank to target an area only.
Dropdown
Building area for the work.
Dropdown
required
Category for the work.
Dropdown
required
Issue type within the category.
Dropdown
required
Priority level for SLA tracking.
Field
Rich text description with formatting options.
Field
Upload supporting files.
If you select an asset, the area is assigned automatically. To create work for an area only, leave Asset blank.
3

Configure assignment and timeline

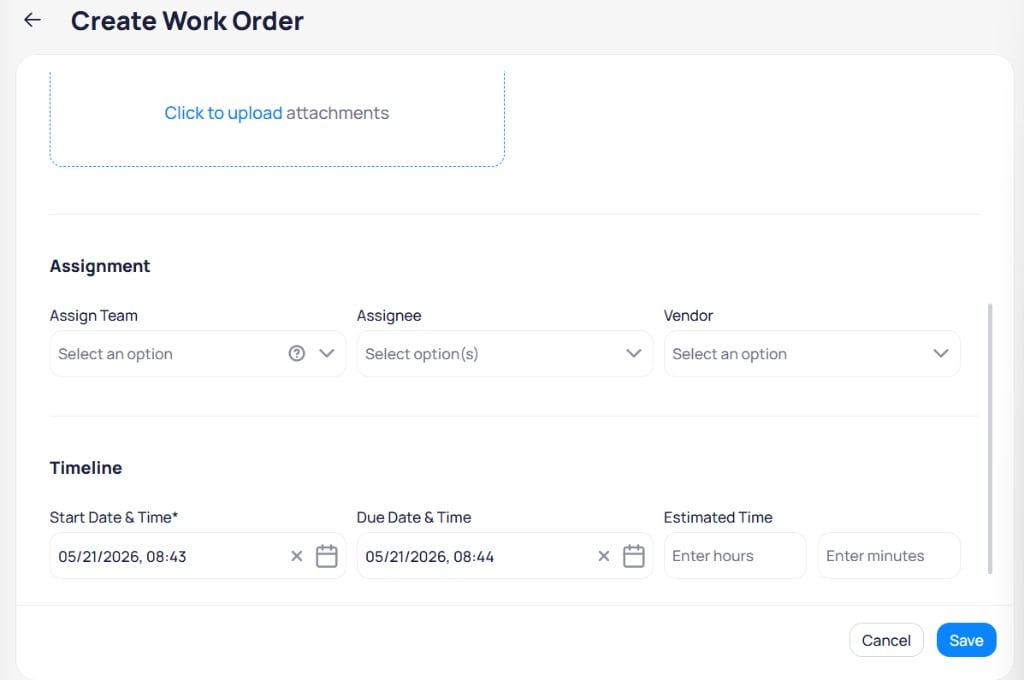
Set assignment and dates.
Create Work Order assignment section with Assign Team, Assignee, Vendor, Start Date and Time, Due Date and Time, and Estimated Time hours and minutes

Assign team, assignee, vendor, start and due dates, and estimated time

Dropdown
Team for the work order. Routing rules may prefill this field.
Dropdown
One or more users assigned to the work.
Dropdown
External vendor for the work.
Date
required
When work is scheduled to start.
Date
Target completion date and time.
Field
Planned duration in hours and minutes.
4

Save

Select Save to create the work order.
When you create work orders from the portfolio level, you must select the target building manually. The form fields match the building-level flow.

Work order detail page

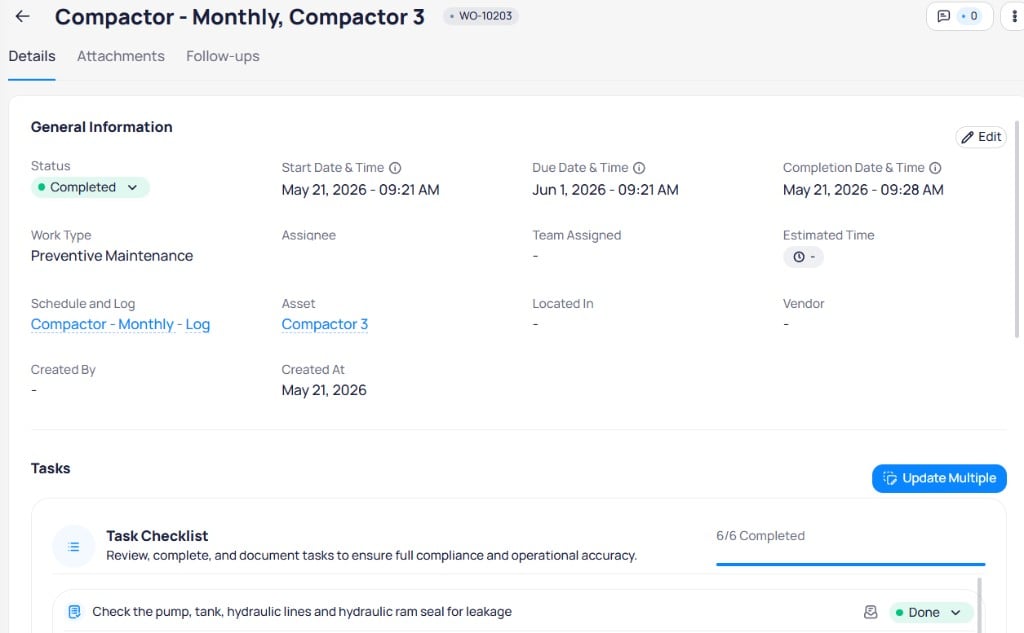
Select a work order Title from the building list to open its detail page. From the portfolio work orders list or the KODE OS Work orders module, select the Title link or the external-link icon beside the title to open the same detail page in building context. The header shows the work order name, ID badge (for example, WO-10203), and actions for comments and more options. Three tabs organize the page:

Header actions

Comments

Select the comment icon in the header to open the Comments panel. A badge shows how many comments exist on the work order. The panel lists comments in chronological order. Each entry shows the author, date, and message text. The system can add automated comments when status changes occur (for example, when a task moves to Not applicable and the work order status updates to In progress). To add a comment:
  1. Enter text in Add comment.
  2. Use the formatting toolbar for bold, italic, underline, links, and lists as needed.
  3. Select Comment to post.
Close the panel to return to the work order detail view.

More actions

Open the vertical ellipsis menu in the header for additional actions.
Status history
The Status history modal lists changes from newest to oldest. The current status is marked Current. Each entry includes:
  • Status name (for example, Open, In progress)
  • Date and time of the change
  • User who made the change, when applicable
  • Note explaining the change, including automated notes when a task status triggers a work order status update
Select Close to return to the work order page.
Schedule run history
For work orders created from a schedule, Schedule run history lists related work orders from the same schedule run. Use Search to find entries. Select the external-link icon on a row to open that work order. Select Close when finished.

Details tab

Work order Details tab for WO-10203 showing Completed status, start due and completion dates, Schedule and Log link, Asset link, and Tasks section with 6 of 6 completed progress bar

Work order detail page with Details tab, general information, schedule log and asset links, and task progress

General information

Select the icon to edit general fields.

Tasks

The Tasks section lists checklist items from task templates or custom tasks. A progress bar and counter show how many tasks are complete (for example, 6/6 Completed).
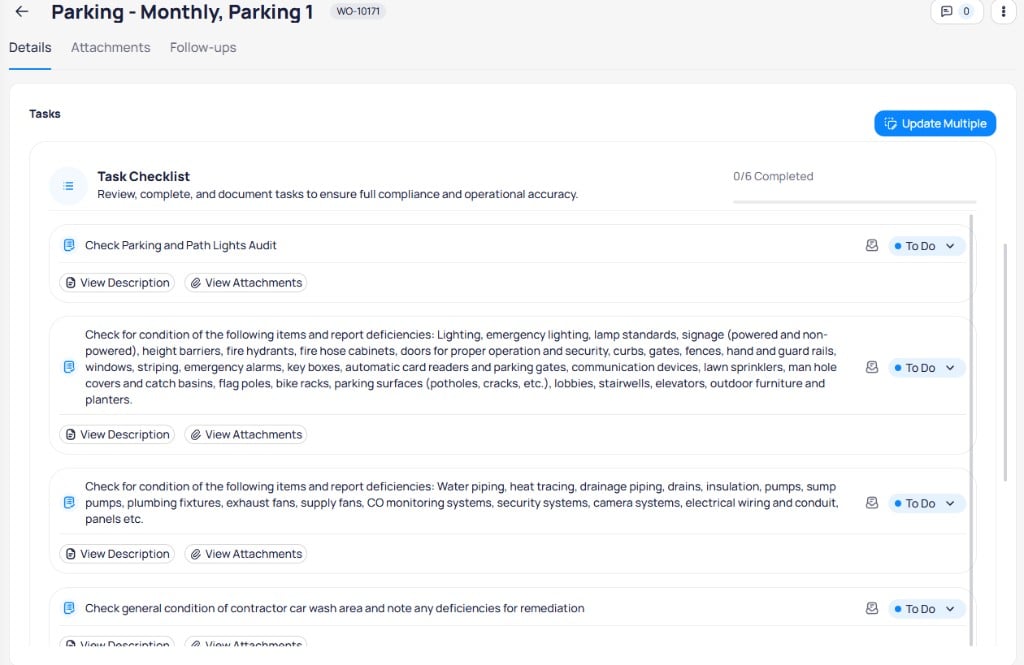
Work order Tasks section with checklist items, To Do status dropdowns, and View Description buttons

Task checklist with status dropdowns and view description actions

  • Select Update multiple to change status and compliance for several tasks at once
  • Use each task Status dropdown to set To do, Done, or Not applicable
  • Select View description or View attachments for task-level details
Set task to done
When you mark a task Done, complete the compliance form.
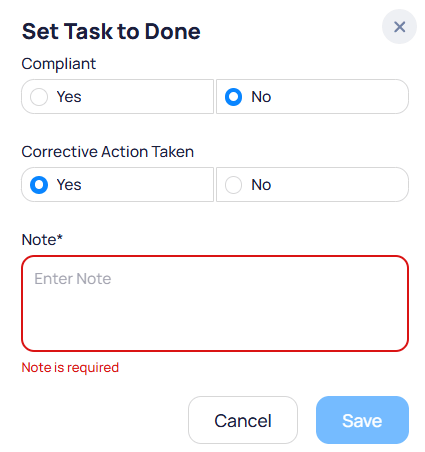
Set Task to Done modal with Compliant No selected, Corrective Action Taken Yes, and Note required validation

Set Task to Done modal with Compliant, Corrective action taken, and required Note

Set task to not applicable
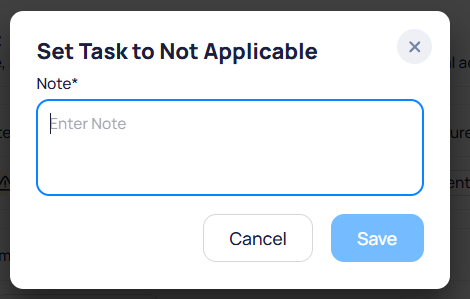
Set Task to Not Applicable modal with required Note field

Set Task to Not Applicable requires a note

Enter a required Note explaining why the task does not apply, then select Save.
Update multiple tasks
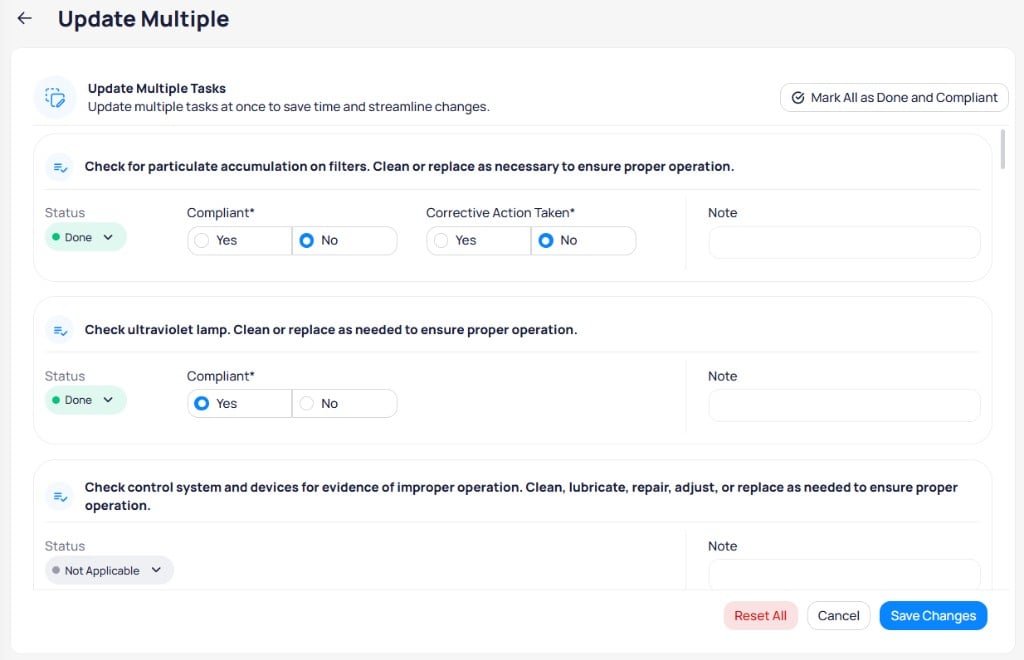
Update Multiple Tasks page with Mark All as Done and Compliant and per-task Done status and compliance fields

Update Multiple Tasks bulk-updates status, compliance, and notes

Select Update multiple from the Tasks section. For each task, set Status, Compliant, Corrective action taken (when required), and Note. Use Mark all as done and compliant for a quick pass, Reset all to clear changes, or Save changes to apply.

Logged time

The Logged time section tracks hours spent on the work order. When no time is recorded, the section shows:
  • No time logged yet
  • Start tracking your work hours to monitor progress.
Start a timer or add time entries from this section to log work against the order. Logged time rolls up to the Logged time column on the work order list and supports labor reporting on the building dashboard.

Attachments tab

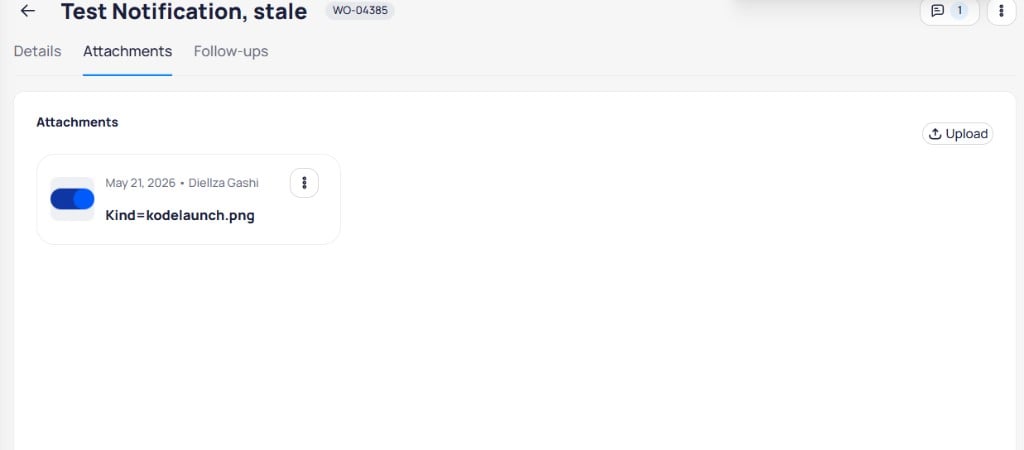
Work order Attachments tab with Upload button and attachment card showing date uploader and filename

Attachments tab with Upload and file cards

  • Select Upload to add files
  • Each card shows upload date, uploader, and file name
  • Use the row menu for file actions

Follow-ups tab
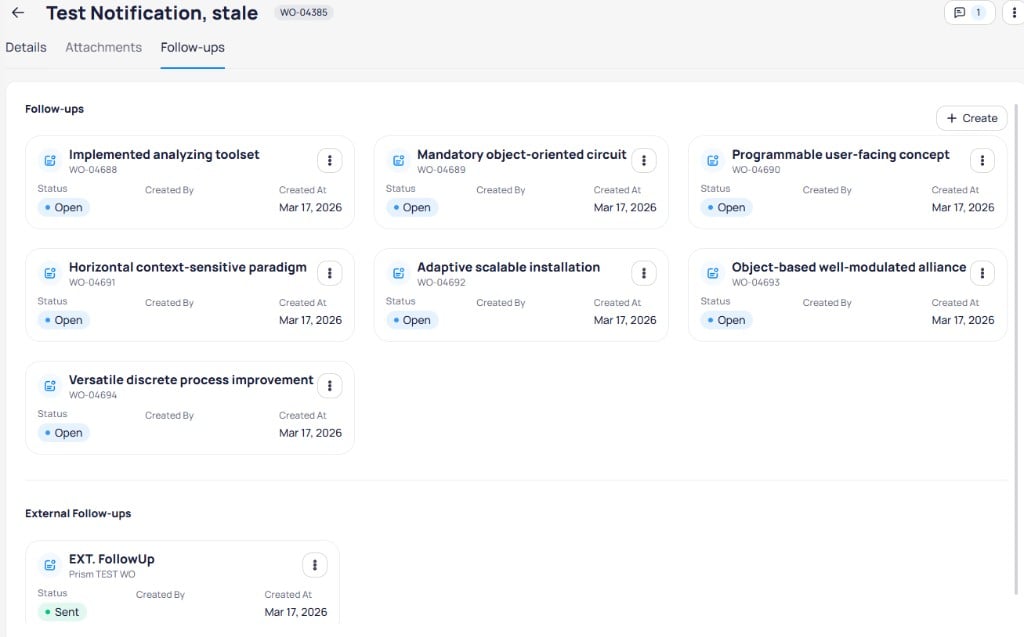
Work order Follow-ups tab with follow-up cards showing title WO ID status and Created At plus External Follow-ups section

Follow-ups tab lists internal and external follow-up work orders

Follow-ups shows child work orders that continue work from the parent order. Select + Create to add a follow-up. Each card shows title, work order ID, Status, Created by, and Created at. External follow-ups lists follow-up work pushed to external systems (for example, a CMMS), with statuses such as Sent.
Follow-up work orders inherit the same asset or area as the parent work order when the parent was created for a specific target.

Schedules

View schedules that generate preventive and inspection work orders.

Assets

Open assets linked to work orders.

Categories

Configure categories and issue types for corrective work.

Teams

Assign teams to work orders and schedules.

Work order fields

Look up statuses, columns, and field definitions in one place.
Last modified on August 18, 2026